Now that we’re saving data into the rrd database, let’s make some graphs so we can see what happens over time to the temperature and humidity values. I chose to use php for this part of the project, as there is a php module for rrdtool that works quite well. We’ll create 5 graphs, Hourly, Daily, Weekly, Monthly, and Yearly. We can also add text to the graphs to show the maximum, average, and minimum values for the time period being displayed.
#!/usr/bin/php -q
<?php
while (true) {
$f = fopen("/var/log/temp_humidity.log", "a+");
fwrite($f, date('Y-m-d H:i:s')." generate graph images begin\n");
create_graph("/var/www/html/temp/temp-hour.png", "-1h", "Woodsmor Cottage - Hourly", $f);
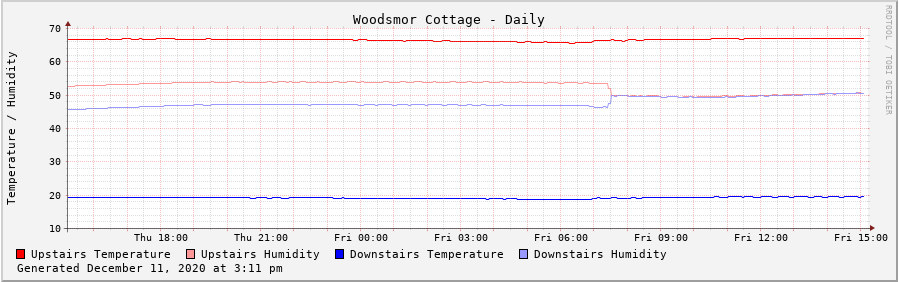
create_graph("/var/www/html/temp/temp-day.png", "-1d", "Woodsmor Cottage - Daily", $f);
create_graph("/var/www/html/temp/temp-week.png", "-1w", "Woodsmor Cottage - Weekly", $f);
create_graph("/var/www/html/temp/temp-month.png", "-1m", "Woodsmor Cottage - Monthly", $f);
create_graph("/var/www/html/temp/temp-year.png", "-1y", "Woodsmor Cottage - Yearly", $f);
$output = null;
$retval = null;
exec('scp /var/www/html/temp/*.png xxxx@xxxxxxxxxxxx.com:/var/www/html/temp/.', $output, $retval);
fwrite($f, date('Y-m-d H:i:s')." images copied to macbook with status $retval\n");
//echo "Returned with output ".print_r($output, true)."\n";
fwrite($f, date('Y-m-d H:i:s')." generate graph images complete\n");
fclose($f);
sleep(3600);
}
exit;
We start off in the same way as the other scripts, by telling the OS which interpreter should be used. Then we have an endless while loop to create the graph images. The first thing we do is to log the start of the image creation process, using the same log file that the sensor data is using. Then we call a function “create_graph” that passes four parameters. The first is the full path and filename for the image, the second is time span the graph will cover, the third is the title of the graph, and the final is the handle for the log file. We call it five times, once for each graph image we want to create. Once the images have been created, I’m using SCP (SecureCoPy) to copy the images to the webserver from the pi. You might just serve them from the pi if you want. I have another computer on my local network that is running a webserver, so I decided the pi will just collect the data, save it, generate the images, and then copy them to the webserver. At the end, we sleep for 3600 seconds (one hour), and then create the images all over again.
function create_graph($output, $start, $title, $f) {
    $date_time = date('F j, Y \a\t g:i a');
    // the : has special significance in graph variables, so it must be escaped
    $date_time = str_replace(':', '\:', $date_time);
    $options = array(
        "--width=800",
        "--height=200",
        "--imgformat=PNG",
        "--slope-mode",
        "--start", $start,
        "--title=$title",
        "--vertical-label=Temperature / Humidity",
        "DEF:utmax=/home/scripts/temp_humidity.rrd:uth_dht22:MAX",
        "DEF:uhmax=/home/scripts/temp_humidity.rrd:uhm_dht22:MAX",
        "DEF:dtmax=/home/scripts/temp_humidity.rrd:dth_dht22:MAX",
        "DEF:dhmax=/home/scripts/temp_humidity.rrd:dhm_dht22:MAX",
        "LINE1:utmax#ff0000:Upstairs Temperature",
        "LINE1:uhmax#ff9999:Upstairs Humidity",
        "LINE1:dtmax#0000ff:Downstairs Temperature",
        "LINE1:dhmax#9999ff:Downstairs Humidity",
        "COMMENT:\\n",
        "COMMENT:Generated ".$date_time
    );

    $ret = rrd_graph($output, $options);
    if (! $ret) {
        fwrite($f, date('Y-m-d H:i:s')." Graph error: ".rrd_error()."\n");
    }
}

?>
This is the function that does all of the heavy lifting. The first thing we do is to build a variable that contains the date and time in an easily-read format so that we can include the text in the graph image. That way we know when the graph was generated. We’ll use that value later.
To pass the options to the rrd_graph function, we build an array of values. We tell it the width and height (in pixels) of the image we want, and the format we want. “slope-mode” says we want a line connecting the data points. The time period is passed as a parameter, something like “-1h”. That means all data will be included starting from one hour ago. The graph title is also passed as a parameter. There is a vertical label defined, but that is optional.
Then we define the four data fields we want to show on the graph. The first parameter in the DEF line is the variable name we will use in the options array, followed by the full path and name of the rrd file. The next parameter is the variable name used when we defined the rrd database. The fourth and final parameter is MAX, indicating that we want to graph the maximum value.
The four LINE1 parameters lay out the legend for the graph. First is the variable name we assigned in the DEF lines, followed by the rgb color values to describe the way the line color should appear. The final parameter is the label for the legend.
The output path and filename, and options array are passed to the rrd_graph function, and we get back a return code. If the graph function fails, we log the reason.
Here’s the complete script.
#!/usr/bin/php -q
<?php


while (true) {

    $f = fopen("/var/log/temp_humidity.log", "a+");
    fwrite($f, date('Y-m-d H:i:s')." generate graph images begin\n");

    create_graph("/var/www/html/temp/temp-hour.png", "-1h", "Woodsmor Cottage - Hourly", $f);
    create_graph("/var/www/html/temp/temp-day.png", "-1d", "Woodsmor Cottage - Daily", $f);
    create_graph("/var/www/html/temp/temp-week.png", "-1w", "Woodsmor Cottage - Weekly", $f);
    create_graph("/var/www/html/temp/temp-month.png", "-1m", "Woodsmor Cottage - Monthly", $f);
    create_graph("/var/www/html/temp/temp-year.png", "-1y", "Woodsmor Cottage - Yearly", $f);

    $output = null;
    $retval = null;
    exec('scp /var/www/html/temp/*.png xxxx@xxxxxxxxxxxx.com:/var/www/html/temp/.', $output, $retval);
    fwrite($f, date('Y-m-d H:i:s')." images copied to macbook with status $retval\n");
    //echo "Returned with output ".print_r($output, true)."\n";

    fwrite($f, date('Y-m-d H:i:s')." generate graph images complete\n");

    fclose($f);
    sleep(3600);

}

exit;

function create_graph($output, $start, $title, $f) {
    $date_time = date('F j, Y \a\t g:i a');
    // the : has special significance in graph variables, so it must be escaped
    $date_time = str_replace(':', '\:', $date_time);
    $options = array(
        "--width=800",
        "--height=200",
        "--imgformat=PNG",
        "--slope-mode",
        "--start", $start,
        "--title=$title",
        "--vertical-label=Temperature / Humidity",
        "DEF:ut=/home/scripts/temp_humidity.rrd:uth_dht22:MAX",
        "DEF:uh=/home/scripts/temp_humidity.rrd:uhm_dht22:MAX",
        "DEF:dt=/home/scripts/temp_humidity.rrd:dth_dht22:MAX",
        "DEF:dh=/home/scripts/temp_humidity.rrd:dhm_dht22:MAX",
        "LINE1:ut#ff0000:Upstairs Temperature",
        "LINE1:uh#ff9999:Upstairs Humidity",
        "LINE1:dt#0000ff:Downstairs Temperature",
        "LINE1:dh#9999ff:Downstairs Humidity",
        "COMMENT:\\n",
        "COMMENT:Generated ".$date_time
    );

    $ret = rrd_graph($output, $options);
    if (! $ret) {
        fwrite($f, date('Y-m-d H:i:s')." Graph error: ".rrd_error()."\n");
    }
}

?>
Here is the Daily graph image created from this script. You’ll notice that the humidity lines merge partway through the day – that’s when I implemented the correction code in the logging script. Also, note that the downstairs temperature is in centigrade, as I mentioned earlier. When this is running at the cabin, I’ll activate the line of code that converts the downstairs temperature to fahrenheit. I would expect the temperature and humidity values to track fairly closely to each other, but that’s one thing I’ll learn as it accumulates data.
Next, we need to integrate the logging script and the graphing script so that they run automatically.
