The Pinarello Build – all wrapped up

The Pinarello build is finished, for now.  Wrapping the bars was an interesting exercise.  The hoods did not want to roll back out of the way while taping like modern hoods do, and tearing the hoods would be a disaster.  NOS Campagnolo brake hoods are hard to find, and even more so in white.  They’re basically ubobtainium so care was essential.

I hit upon an easy way to lift the hood out of the way so that the tape could be properly placed underneath it.  I used a Park Tool plastic tire lever.  I put a little soap on the top (the part that would touch the hood) so that it would slide more easily.  I wrap from the bottom up, slid the lever under the edge of the hood, lifted it, and continued on.  The same on the top of the lever.  The tape is tucked where it should be and the hoods are undamaged.

I use silicone self-fusing tape to hold the free end of the wrap in place.  No gooey mess in the summer heat, no sliding around and loosening, just tight and goo-free.  I learned to cut a taper in the tape so that the ends aren’t too wide when the tape is stretched while wrapping the end of the bar tape.

I’ll get a couple of photos today if the rain holds off.  That’s it until I rebuild the wheels with new rims and spokes.  The front rim has an annoying “bump” near the rim seam that you notice while braking.  It’s not ideal, but it will be OK until I can get the wheels rebuilt.

Patience is a virtue, but one that I don’t have in abundance.  This build took a long time from when I bought the bike, but I think it’s turned out well.  And for you patient souls that followed along with this project, photos follow.

3rd Annual Bourbon and Tobacco Tour – Rescheduled!

RIDE RESCHEDULED for the weekend of September 12-13, 2020.

Good pavement, nice gravel, light vehicle traffic, courteous drivers, and the hills of western Kentucky in the springtime – what’s not to like? Well, your legs might complain about some of the gradients, but the descents make it all worthwhile. And the riding companions – unparalleled.

A few updates for the COVID mess:

Rather than meeting at my house for dinner, we’ll just pick up dinner in Cadiz and meet at the park on the west side of town to eat and tell biking lies.  My wife will be much happier with this, and there’s plenty of parking and tables for us.  Because I don’t know what will transpire between now and the ride, please bring a mask and put it in your jersey pocket.

There are plenty of places to pick up some food – pizza at Casey’s, mexican at El Bracera, Sonic, Wendy’s, Taco Bell, KFC, Triplets, Cracker Barrel, and Subway.  I’d rather have everyone at my house for a cookout, but I’m trying to make some adjustments that will work for everyone.  I appreciate your understanding.

Friday dinner, September 11:

For those folks coming into town on Friday, we’ll meet at Triplett’s BBQ in Cadiz for dinner. The restaurant is on US68/KY80 just west of I-24 at exit 65.

Saturday, September 12:

We will meet at 9:30am at the LBL Golden Pond Visitor Center on the Woodlands Trace Road, at the intersection of US-68/KY-80.  There is plenty of parking at the visitor center. I will have some repair/adjustment tools, grease, chain lube, floor pump, work stand, and some spare tubes and patches. Hopefully no major repairs will be needed before, during, or after the ride but we’ll be prepared for the usual (and some of the unexpected). We’ll roll out from the parking area around 10am.

There is no cost for these rides. If you want to chip in a little for the Saturday post-ride cookout, that would be appreciated, but it’s neither expected nor required.

The route:

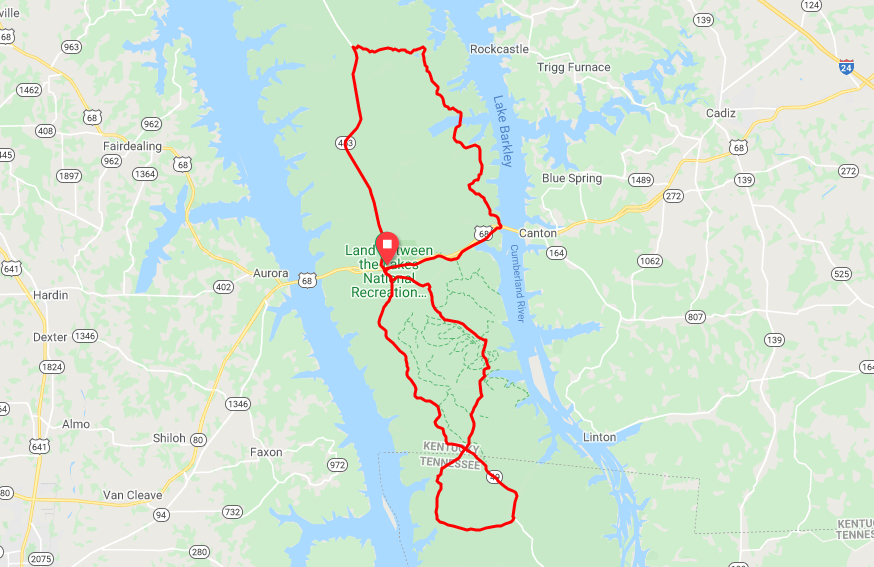
The route has been updated for 2020, and is entirely within the LBL. This loop starts and ends at the Golden Pond Visitor Center in LBL, and is about 56 miles, all paved, with about 3500 feet of climbing. There are a small number of actual turns in this route, so hopefully there won’t be any issues with navigation or getting lost. I will give my cell number to riders, should assistance be needed during the ride.  Cell coverage isn’t always the best in LBL, so bear that in mind.  This is an unsupported ride, but we will do our best to help everyone finish up safely.


Click to Download Cue Sheet for the full route

Click to Download Cue Sheet for the partial route

Other cool stuff to do:

If you want to come in a day early, or stay over for a day or two, you could follow the Kentucky Bourbon Trail.  If you like bourbon and want to sample the offerings by several distilleries, this is a great way to do it.  Check out where the distilleries are located and plan your route.

You can drive north on the Trace Road, and drive through the Elk and Bison Sanctuary.  There’s a small fee at the entrance to the sanctuary, and it’s well worth it.  I’ve been there more than once and it’s a unique opportunity to see herds of bison and elk moving around the area.  You do have to be in a vehicle – a bicycle vs a 2000 pound bison – no thanks.

There is a trap range close to the Lake Barkley Lodge, so if folks are interested we can shoot some clay targets.  No prizes, just bragging rights.  I have shotguns, ammunition, and clay targets – so all you’ll need is hearing and eye protection.  If you’ve not done this before, it’s challenging and fun. If you’re new to this, I’ll be happy to help you shoot safely.

Post-ride cookout:

See the COVID notes above for Saturday dinner plans.

Sunday, September 13 – ride the trails:

If folks are interested, we’ll take some fatter-tired bikes out for some trail riding on Sunday. There’s a lot to choose from, the map links below will give you an idea of the variety available to us.  A good choice is the Hardwoods Trail, from east to west all the way to Kentucky Lake.  Mostly crushed limestone and a lot of fun.  I would rate this trail as easy/moderate.  Bikes with road tires won’t be the best choice for this – wider tires are the best way to go.

A local friend and riding buddy will lead the gravel ride on Sunday, he knows the gravel routes in LBL much better than I do.

At the north end of the LBL, there is a good singletrack loop named the Canal Loop.  I would rate this loop as moderate/difficult.

There is a fairly new option, the trails in Livingston County, to the north of LBL.  I’ve ridden there a few times and it’s a lot of fun.  These trails are rated intermediate/difficult, so bring your “A” game. Be advised, you will want some tread on your tires for these trails.

We’ll figure out when and where to meet during the cookout and I’ll update the information here.

LBL Hike and Bike Trails

LBL Maps – click the Trails tab.

Livingston County MTB Trails

There are 500 miles of trails and 200 miles of roads in LBL. It is great to have this area so close to home. Not all of the trails are available for bicycling, so check the website while you scout a potential route.


Temperatures to expect:

The average high temperature in September is 83 degrees, and a low average temperature of 58 degrees, so pretty good riding weather.

Lodging:

Here are some options for lodging and some suggestions for restaurants in the area.

Kenlake State Resort Park Reservations

Lake Barkley Lodge reservations

Both are reasonably priced and are just a few minutes from our starting place. Kenlake and Lake Barkley both have restaurants too. For those folks arriving on Friday, we’ll meet for dinner.

Red Roof Inn – Cadiz

Quality Inn – Cadiz

Both of these hotels are at I-24 exit 65, and are within walking distance of Triplets.  Driving time to the start point is 20-30 minutes.

Bike Shop:

Bikes and Moore in Hopkinsville is a great shop that I’m happy to call “home”.   I couldn’t find a complaint if I tried. Good folks and they’ll be happy to help you out, should you need more than a tweak or two.  They have knowledgeable mechanics and a good parts inventory too.

Questions:

Contact me if you have any questions, I’ll do my best to help.

Please watch your speed while driving in LBL, it’s federal land, so speeding tickets are expensive – paraphrasing Agent K – “the rangers do not have a sense of humor they’re aware of.”

The Pinarello build – wrapping up

The maiden voyage with the newly finished Pinarello went fine, no major issues. The front brake lever slipped a little on the bars, but that’s an easy fix.

The harder fix is the stem. The original stem is a 3T, with Pinarello pantographed on both sides of the stem. It’s 70mm long and at least 40-50mm too short for a reasonable fit. I really don’t want to swap out the pantographed stem, but the fit isn’t good with it due to the short length. I picked up another 3T stem that is 110mm long and I think it will give me a much better fit – but I lose the pantographed stem in the swap. It really isn’t the trade I want to make, but if the bike isn’t comfortable to ride it will sit unridden – and the Pinarello deserves to be ridden and enjoyed.

The headset is better than my first assembly but it is still rough. It’s really noticeable when riding hands-off, and especially when riding hands-off and pedaling. It’s bad enough that it needs to be fixed so I bought a replacement.

<START OF RANT> Note to ebay sellers – you can’t say an item has been shipped when you print a shipping label. It’s shipped when you deliver it to the shipping company, whether that is USPS, UPS, FEDEX, or another shipper. I’ll be taking this up with the seller when I receive the headset, and the complete tracking history shows the sequence and timing of it all. <END OF RANT>

Once both parts are here, I’ll swap them both at the same time, and when it’s back together a short ride will confirm that everything is set up and working properly. Then I’ll wrap the bars and call this project done.

The Pinarello build, part 3 and a test ride

Installed the Cuissi Inox bottle cage (thanks, Rob), and the Campagnolo crank bolt covers.

Ground about 3mm off the seatpost binder bolt recessed nut, filed it smooth, and installed it.  Greased the seatpost and installed it.  Clamped the SA white saddle to the seatpost and sort-of aligned it.  Tightened the clamp bolts but it will need to be set to the right place once the bars are on.  The white saddle looks great with the blue frame and the white decals.

The bearings and the brake lever ferrules are supposed to be delivered on Saturday, they are the last parts I’m waiting for to finish the build.  Getting it ready for the maiden voyage should take a couple of hours.

The headset bearings were delivered a couple of days earlier than initial estimates.  Under-promise and over-deliver is alive and well – but no complaints.  I replaced the 5/32 bearings with 3/16 bearings, and quickly noticed that the lower race wasn’t in the correct place in the lower cup.  That meant that this headset uses 5/32 bearings, which is what I had.  After texting back and forth with a knowledgeable bike guy (thanks, Bob) I learned that 5/32 is in fact correct, and that I had not used the correct number of bearings.  I fixed that error and the headset is much better.

Installed and adjusted the stem and bars.  Pretty easy and quick once the headset was sorted out.

Next is the brake hoods.  I lucked onto a set of NOS Campagnolo white brake lever hoods a few months ago and picked them up, knowing I would use them on this build.  Installing the hoods was an exercise in frustration and anxiety, since older hoods are known to tear when stretched, and you must stretch them to get them onto the brake levers.  Another knowledgeable bike guy (thanks, Scott) suggested putting the hoods in very hot water, allowing them to become more pliable, and then sliding them onto the lever body.  It worked – no tears and they’re in place on the levers.  Slid the levers onto the bar, positioned them to what I think is the proper place, and tightened them down.

Ran the brake housing for the rear brake, left of the stem and up under the bars then down to the lever.  Checked lock to lock bar turns without any binding, and cut it length.  Installed the cable and clamped it in place.  Rear brake is braking.

Ran the brake housing for the front brake, make the housing loop the same height as the rear brake housing, cut it to length, installed the cable, clamped it in place, and we have front braking.

It’s ready for a test ride.  Rechecked the fasteners to be sure they’re tight, and rode down to the neighbor’s house and back.  There is a bump in the front rim that I noticed while braking – I might be able to repair that but if not, I was going to relace the hubs to new rims anyway.  I just might have to move that project up earlier on the calendar.

The levers seem to be correct, but I want to get some miles in before I decide that for sure.  Once that’s settled, I’ll wrap the bars and the Pinarello will be finished.  Thank you for following along with this project.

The Pinarello build, part 2

The replacement bottom bracket arrived a day earlier than expected, and given the increase in the number of items that are being shipped these days, is something of a surprise.  A good surprise.  Confirmed that the BB is the one I ordered and installed it, torquing the cups to the proper spec.

HOWEVER, the axle in the cartridge BB, being the correct length is not the only part of the puzzle.  The original axle is asymmetric, meaning that the drive side extends further from the centerline and the non drive side is closer to the centerline.  The difference is enough that the chainrings don’t have enough clearance with the symmetrical axle.  So, the search begins for a replacement BB with an asymmetrical axle.  Luckily enough I found one and it finally arrived.  The cup and axle races are in excellent shape, so we are back on track.  Cleaned, greased, and installed.  Crankarms are on and torqued, and the clearance to the chainstays is good, for both the chainrings and the crankarms themselves.  This crankset is old enough that the crankarms are straight, not curved, so the clearance is set by the width of the bottom bracket axle.

The Nuovo Record RD is lubricated at the pivots and the main bolt, and installed.  The spiral SS housing and liner are cut to length and installed.

The front derailleur attaches to the seat tube by a band that clamps around the tube.  To position it properly, the cage that encloses the chain needs to have 2-3mm clearance between it and the largest chainring.  There is some debate about the proper orientation of the cage to the chainrings.  Some folks say they should be parallel – others say the rearward part of the cage should be slant towards the center of the bike by a couple of degrees.  I’m going with parallel for now.  Friction shifting is more forgiving than indexed shifting.

Installed the chain (without going through the derailleur cages) and sized it to big-big plus 4 links.  I think it will wind up 2 links shorter than that, but I’ll let the shifting performance tell me if that is necessary.  Ran the shift cables, using cable liner around the BB shell for both FD and RD cables.  The RD hanger was not straight, it was in a bit at the bottom.  Adjusted it to straight, then reinstalled the RD.  Fished the chain through the FD and RD, installed the quick link.  Set the hi-lo limit screws and adjusted the shifting.  Installed the pedals and torqued to spec.  Adjusted the axle locating screws in the rear dropouts to center the rear wheel.

A bit of headset drama – whoever assembled the bike before I bought it used 5/32 balls in the upper and lower races, and I found out that Campagnolo used 3/16 balls in their Nuovo Record headsets.  I ordered a bag of 3/16 balls so that I can replace the existing balls with the correct size.  So until they are here, I’m pretty much at a standstill.  A good friend used the phrase “parts pause” and it certainly applies here.  Frustrating, but a part of the C&V build game, at least for those of us without a large parts inventory.

Until next time…

Pinarello Turismo – the build begins

I’m finally getting around to the Pinarello.  This frame was built in 1983, so it’s coming up on a 40-year birthday.  Columbus SL tubing and a full Campagnolo Nuovo Record group make it a great example of Italian craftsmanship.  I’ve been riding outside a fair amount, and that always spurs interest in completing bike projects.  This build is no exception.

Duane at chestercycles.com painted and decalled this frame, and it’s stunning.  I had been putting off starting the build because I was hesitant about reinstalling the headbadge and it needs to be done first.  It’s held on by two “drive screws” which have very coarse threads and are hammered into a properly-sized hole.  There’s no real stress on the screws, they just hold a small headbadge to the headtube.  Not wanting to risk denting the headtube and not sure about a good way to prevent that I was hesitant about the job.

I decided to use a deep-well socket that fit nicely into the head tube as an inner support, which, as it turns out, was not needed.  I used a small dab of glue under the badge, set the drive screws in place, and tied a strip of cloth around the badge and the headtube to hold it in place while the glue dried.  Since that task is now done (whew!), on with the rest of the build.

Waxed the frame and fork.  Cleaned the headset cups and the fork crown race.  Pressed the cups in, one at a time, and turned the frame upside down in the stand.  Added grease and the appropriate number of bearing balls in the lower race, then installed the fork.  Next was grease and bearing balls in the upper race.  Keyed washer and the top nut completes the fork install.  It’s a little rough, the lower cup and the crown race might need to be replaced.  I’ll take it apart after a couple of rides and see how it looks on the inside.

Cleaned the bottom bracket bearing cups in preparation for installing the BB.  Cleaning up the axle I noticed a badly galled section on one side of the axle.  No point to install it, it won’t last long and would make ugly noises while riding.  I ordered a Campagnolo cartridge bearing BB to replace it, and I’ll keep my eye open for a replacement axle.  I would like to use the original BB if at all possible.

Cleaned the downtube shifter parts in the ultrasonic cleaner and installed them using a thin film of grease, not an excess.  No grease on the adjuster threads.  The tension adjustment works predictably, hopefully it will hold it’s position while riding.

Went to install the brake calipers, and realized a mistake on my part.  The replacement Nuovo Record calipers I purchased are nutted, and the original calipers used recessed nuts.  Fortunately, swapping the center bolts took only 10 minutes for both front and rear calipers, and they’re freshly lubed and installed.

I can’t do much more without the BB installed, so I’ll lateral over to filling the seatpost and stem pantographing with paint in the meantime.

Stay tuned for the next instalment…

2020 Rides

I’ve been looking at a calendar and conversing with some fellow C&V enthusiasts (inmates) about meeting up at some rides next spring, summer, and fall.

The COVID-19 problems have put a wrench in many planned rides, and some have been cancelled or delayed as a result.  As soon as I have information for the rides I’ve included here, I’ll update this post.

There will be the Wednesday evening shop rides, and the Saturday morning rides throughout the season.

CANCELLED FOR 2020 – May – on the 9th, I’m planning on the Rockin River City Ride, a metric century in Evansville, Indiana.  Should be a good warmup for the Storming of Thunder Ridge ride later this month.  I’ve emailed the ride organizer asking about 2020, but have not received a response.

CANCELLED FOR 2020 – Later in May – on Sunday the 17th is Storming of Thunder Ridge in Lynchburg, Virginia, which is a very popular ride and a challenging century.  Registered for this one.  I’m planning to ride the Masi, but if the weather is iffy, the Merckx is well set up for climbing.

June – a couple of riding days are planned in and around Mineral Point, Wisconsin. Good friends, good roads, and hopefully good weather will make this an enjoyable trip. I really enjoy riding with this group, so an opportunity to do that won’t be missed.

CANCELLED FOR 2020 – July – on the 18th is the Ride Across INdiana (RAIN) that goes from Terre Haute to Richmond in a single day.  165 miles, mainly on US-40.  I sure hope it’s not as hot as it was last year, that was just brutal.  The organizers are planning a go/no-go decision by June 1.

August – the Wabash River Ride is on the 29th.  I haven’t ridden this one before, so right now it’s tentative.

RESCHEDULED – September – the Bourbon and Tobacco Tour will be the weekend of the 12th-13th.  Road on Saturday, gravel on Sunday – should be a good weekend of cycling in the hills of western Kentucky.

CANCELLED FOR 2020 – September – the Big Dam Bridge century in Little Rock is the last Saturday of the month.  Registered for this one.

The Tanner’s Orchard ride is planned for sometime in September.  I hope the weather cooperates, I don’t want to miss the ride this year.

CANCELLED FOR 2020 – October – the Kent Jones century is scheduled for the 10th in Jackson, Tennessee.  A nice route, good rest stops, and a good warmup for the Hilly Hundred later in the month.

CANCELLED FOR 2020 – Later in October  – is the Hilly Hundred century, in and around Bloomington, IN.  Unusually for a century ride , this one is split into two days of riding over Saturday and Sunday.  A good time, great route, hills (as you would expect), and fun rest stops.

This is a tentative set of rides.  Life happens, so changes are possible.

An interesting ride

The temps were close to 60 degrees which is a little unusual for early December in Kentucky.  Not willing to let that pass us by, we headed over to Land Between the Lakes for a paved/gravel/trail ride.  I rode my Cannondale ST600 with 35mm tires, Bobby was on his Trek Boone.

We started at the same place the Bourbon tour started, and rode north.  There are some good climbs in the first few miles – all of them over 8%, one at 10% and one at 11%.  A quick wake-up for the legs.  We went north to the 4-way stop and turned right.  The Bourbon tour route continues north to the nature center.  Today we chose a more circuitous route.  We rode to the old Empire Farm and saw the Silo. Quite the visitor attraction a few years ago, closed now. Check out this article about it.  For some reason that I cannot remember, we rode back to the nature center on a hiking trail.  We crossed a gravel causeway over Honker Lake.  Roots, slippery leaves, a creek crossing, a sketchy descent down a hill with leaves covering the trail and roots hiding under the leaves, and some stairs going up and down all thrown in for good measure.  I’m not sure we should have been cycling on the hiking trail, but we made it just fine.  Maybe not our best decision, but we made other dubious decisions today – just to keep things in perspective.

It was getting dark when we left the nature center with about 18 miles to go.  West to to the Trace road, then south to the visitor center, then east back to where we had parked.  Riding on 68-80 with only 1 rear light and no headlights between the two of us was just another not-so-bright (pun intended) decision.  We got back to the parking area just fine and headed home.  Trying to stay on a hiking trail in LBL at dusk is not recommended. In retrospect, we should have started at least an hour earlier, 90 minutes would have been better.

I had a bright yellow jersey on, and Bobby’s bike is painted bright yellow too, so there’s that.  I know both of us should have had front and rear lights, and we will next time for sure.

Our route was a bit over 31 miles, with over 2000 feet of climbing.  Most of the climbing was in the first half of the ride.  Tired legs are the result.

Masi Nuovo Strada – the tweaks

The Masi build was finished, but there were some changes I felt were needed.

First, the Koolstop brake holders and pads just didn’t look right. I had picked up a set of Campagnolo replacement pads for the Chorus pad holders, but they slipped into the holders a little too easily. Rolling the bike back with the brakes applied would have probably slid the pads out of the holders – not good. A friend suggested that I look for Clark pads and I found them on ebay coming from the UK. Once they arrived, I found they fit the holders perfectly, and installed them. Then I swapped the Chorus holders and pads in place of the Koolstops, and we have Campagnolo braking bliss again.

Second, the tubulars on the Mavic GP4 rims were Yellow Jersey 3-fers, and I wanted top end tubulars for this bike. I picked up a set of Vittoria Corsa Speed G+ tubulars, and decided to use Effetto Mariposa tape to mount them. This would be my first set mounted with tape, I had used Panaracer glue on the YJ tubs the first time. The Effetto rim cleaner worked very well, and you could not tell that a tub had ever been mounted on the rims. The actual taping for the tubs was anticlimactic – it took less than 10 minutes per wheel. I left a small section of the rim untaped opposite the valve stem, to make it easier to remove the tub if an on-the-road swap was needed. Put the tape on, press it firmly onto the rim, and fold the plastic film over the edge of the rim. I used cellophane tape to hold the plastic film in place while I installed the tub. Add some air, up to about 40 psi or so, and straightened the tub so that it tracked as it should. Then you just pull the plastic film out, recheck the alignment, and add air up to 120psi. Let it sit at that pressure for a day or so and it’s done.

The latex tubes in the Vittoria tubs lose pressure after a few days, but I always top off the tires before every ride whether tubs or clinchers so that’s no real issue for me. They ride beautifully, making chip seal roads feel almost like fresh tarmac, except for the sound. After talking with more experienced riders, I decided to try higher pressures than I had been using – I’m at 95F and 110R now, and the performance is great. The Corsa Speed tubs are not renowned for their puncture resistance, but either I’ve been lucky this year or I’m careful where I ride (maybe a bit of both) and they’ve been fine.

Centenario Coppi 2019 – Hollandale, WI

First, sincere thanks to Dave and Rob for their behind-the-scenes and in-front-of-the-camera hard work. It would not have been the success it was without your efforts. THANK YOU.

I missed the warmup ride on Friday, but the Friday get-together at Tony’s Tap was great. Nice to see some friends from previous rides, and to put names with new friend’s faces. This is a really remarkable group – different backgrounds, ages, education, jobs, from different parts of the country – but we all enjoy cycling and the people it brings together.

On Saturday morning, we met at the guest house for another warmup ride. Immediately, we’re climbing – this is a theme that repeats itself many times. Good roads, and the group stopped often enough to keep everyone together. In Dodgeville, we rode a rails-to-trails that I think is called the Military Ridge Trail. It ran the gamut – pavement, chip-n-seal, gravel, sand, and mud. The muddy parts made it a little risky to keep the speed up, but I don’t think there were any casualties. We agreed to meet up again at the A&W in Dodgeville for a root beer (as a recovery drink, of course), and then to head back together. A quick shower, and it was off to Hollandale to set up the bikes for the show. There were some VERY nice machines there, and some that are the only example of the breed (at least the only examples I’ve seen). A lot of time to talk and meet folks that weren’t at Tony’s the night before. There was a lot of accumulated bicycle knowledge in the Hollandale town hall on Saturday – truly staggering. There was bread, olive oil, and parmesan cheese to take the edge off before dinner. The dinner was first rate, can’t say enough good things about it. Afterwards the awards were handed out, and I apologize for not remembering the recipients. Then we packed up the bikes, cleaned up, and headed back to our various accomodations. Sunday’s ride awaits.

We met at the Hollandale town hall again Sunday morning at 8am, for coffee, scones, bananas, and other assorted delicacies. Fuel, you know. Dave and Rob were in the cat-herding business and were mostly successful. We rolled out around 9am, and guess what – a relatively flat start for a little while, then a right turn and a respectable climb. Someone had painted a purple COPPI on the road about 2/3 of the way up. The climb and subsequent descent theme played out often and was unrelenting. A couple of the climbs on County Road Z and Sandy Rock just weren’t fair – you crest what you think is the top, only to see a “wall” yet to be climbed. It wasn’t actually a wall when you got to it, but it was a little demoralizing to see it and realize that you’re not even close to being finished with that climb. But you persevere and you earn the reward on the other side.

One of the descents early on came up to a T, with a left turn and the fresh chip-n-seal had left a fair amount of loose gravel right where you needed to stop and check for traffic. There were a few skidmarks in that gravel when I got there, but I didn’t see any evidence of bandages, blood, or abandoned bike parts – so apparently everyone got through that part safely. County Z had a few rough spots, but for the most part the roads were in great shape. My GPS track showed a couple of descents at over 40mph, so I guess the work to climb up for them was worth it.

The rest-stops-that-weren’t-rest-stops-because-this-was-an-unsupported-ride were welcome, and a sincere thanks to those folks spending their time to help a bunch of moderately-insane cyclists enjoy a great ride in beautiful southwest Wisconsin.

Brats back at the Hollandale town hall afterwards were a nice way to crown off the weekend. Congrats to Allan and Pete  for being beasts. A welcome to his first event to Nic with his very nicely done Trek. Nic and I rode together on Saturday and Sunday, and I enjoyed that very much.

I feel privileged to have enjoyed the people, bikes, and the rides as much as I did.