Ups and downs

Usually, descending follows climbing, more as a reward for the work of climbing as anything else.  Used the old BB guide and cut the new Campagnolo BB guide to fit, installed the cable guide, cable liner, and the cable runs are clean.  Cut the front derailleur housing (the only housing for the front derailleur), and installed it.  Cut the front piece of housing for the rear derailleur and installed it.  Checked to be sure the housing looks good at lock to lock turns, and it’s good.  Cut the second piece for the rear derailleur.  Shift housing is cut to length, lubed, and installed – cables are run.  Need to set the low limit screws and fasten the cables to the derailleurs.  Then the chain, then adjust the derailleurs.

Clamped the rear derailleur cable and adjusted the high limit by eyeing the jockey wheels and the small cog – close enough for a start.  The low limit can’t be adjusted until I put the chain on, so that the derailleur can be properly spaced away from the large cog using the B screw.  Installed the chain, which needed to be shortened by one link.  This was because the new crankset is a 50/34 compact and the old one was 52/39.

The front derailleur does not shift up or down.  Will have to pull the cable out and see if I can figure out the problem.  Until I can shift to the big chainring, I cannot finish the rear derailleur adjustments.  FIGURED IT OUT!  There are two holes for the cable in the shifter body, and I had the cable in the wrong one.  Once I fixed that the front derailleur shifted fine.  Now I can work on the rear derailleur adjustments.

Was having trouble getting the rear derailleur to shift onto the big cog, so I suspected the derailleur hanger wasn’t straight.  Sure enough, it wasn’t, so I adjusted that and then the rear shifting was easy to adjust.  Installed the pedals, and crimped caps on the cut cable ends.

Now we can change gears for climbing and descending, which is a plus.

Now to finish up the build…

Moving forward by preparing to stop

Moved the handlebars with the brifters installed, and then removed the old bar tape and cables.  Cleaned the old adhesive off the handlebars.

Decided to run the brake cables first.  Replaced the cables, then the housings.  Next is to cut the housing to length, after taping the housing in place on the handlebar.  Remembered to pull hard on the brake levers to be sure the housing is fully seated in the brifters before marking the length and cutting.

Cut the housing and installed the front brake housing and cable.  The front pads were properly aligned so no changes needed there.  Cut the front housing for the rear brake cable and installed it.  Got the rear brake cable and housing done and the brake pads and caliper adjusted.  Used tri-flow to lubricate the cables.

Now on to the shifter cabling…

New bike project hiccup #2

I removed the brake calipers from the CAAD8 frame, but cannot mount them on the Merckx frame.  The reason?  The recessed nut used to attach the rear caliper isn’t long enough for the thicker brake bridge on the carbon frame.  The one for the front caliper might work OK, but the rear one isn’t even close.  I’ve ordered a couple of longer ones, so once they arrive I should be able to mount both brake calipers and then continue with the project.

I can turn the length down on the lathe if they’re too long, but hopefully they’ll just work out OK.  Riiiightt…  That always works for me.

UPDATE: The recessed nut for the rear caliper was about 4mm too long.  Once that extra was removed, the calipers are now both installed and torqued.

There’s always something you hadn’t considered.

New bike project and hiccup #1

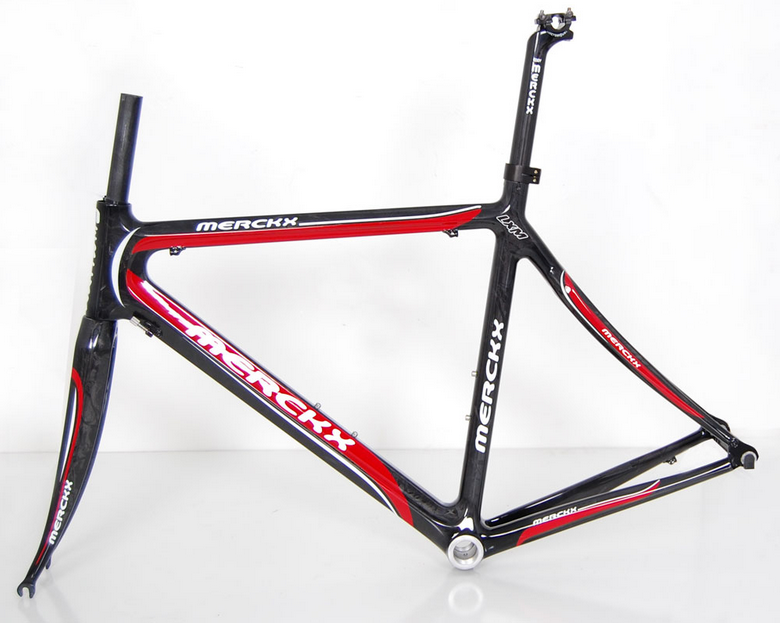
Well, at least a new frame.  I picked up an Eddy Merckx LXM carbon fiber frame a couple of years ago, and now i’m finally getting around to doing something with it.  My plan is to swap the entire Campagnolo group from the CAAD8 frame to the Merckx frame, and along the way to replace the cables/housings, clean up everything, and replace the bar tape as well.  I don’t need many parts for this, mostly consumables like cables and cable guide, plus bar tape.  The existing stem may or may not work with this frame, that will have to wait until it’s actually rideable to make that determination.

Hiccup #1: The bottom bracket shell was English thread, but it appears to have been sleeved to that thread size since all information I could find indicated that it was originally Italian threading.  Also, the shell width was too wide at 70.5mm.  That has to be fixed, since the crankset requires a 68mm shell width.  I wound up at Halcyon Bikes in Nashville, TN, and they took care of facing the shell down to 68mm, and while they had the frame they installed the BB cups and the carbon compact crankset (50/34).  Now that this issue is handled, the rest should go fairly quickly as I have the other bits I need for the swap.

First is to move the brake calipers from the CAAD8 to the Merckx.  next will be the front and rear derailleurs, but I need to take a photo of the cable routing so that I can properly set them up.  next will be the handlebars/stem and I’ll probably leave the brifters mounted exactly where they are.  Wheels are easy enough, and the cables/housings are next.  Finally the seatpost and saddle, and it will be rideable.  I will wait to wrap the bars until I have a few miles, to be sure that shifting and braking are correct before covering up the cables.

My first carbon bike – I’m really interested to see what differences I notice between the stiff alloy CAAD8 and the carbon Merckx.  Time and some miles will tell the tale.

More parts for the IGH build

I ordered Velocity Synapse 650B polished silver rims, in 36 hole drilling from yellowjersey.org.  I thought they were a little pricey, but they will work and I can use the tire width I wanted for this build.  I’ve also ordered spokes from Colorado Cyclist – they are DT Swiss Competition DB spokes in silver.  So once they get here, I can lace up the wheels.  I still need to order tubes and tires, but I haven’t done that yet.

I also ordered a Sunlite 2-bolt quill stem in polished silver.  I don’t understand why more quill stems aren’t available in a 2-bolt design.  With it, you can remove the handlebars without having to remove the bar wrap and brake/shifter lever (at least on one side).  Maybe the manufacturing process is more complex for this type of stem, I’m not sure about that.  They’re not very common, or at least I haven’t seen many.

The handlebars are by Soma Fab, the alloy 3-speed moustache bars.  I plan to mount them so the center is higher to get a bit of drop.  Once the bike is assembled I’ll be able to adjust the stem depth and decide wchich way the handlebars need to be mounted to get the best riding position.  My plan for grips is lace-on elkhide from VO.  This is why I wanted the 2-bolt stem – I don’t want to have to unlace the grips to remove the handlebars.

I decided a build like this needed a bell.  I found a really nice one, made in the UK, and ordered it in brass finish.  The bell will be engraved with “Evan Cycles” to match the frame decals.  Since the only handlebar control is the bar-end shifter on the right, the bell will mount on the left side just above the elkhide grip.

I hope it turns out well, I’m going for retro-simple on this build.

The new build hiccups…

A hiccup in the new build.  The Univega frame I’m using is a very tight fit for 700C wheels.  I was hoping to use slightly wider then usual tires on this build and there’s no chance to do that with 700C wheels.  Since I’m lacing the wheels myself, I don’t have to try and find a set of 650B wheels, I just need to buy two 650B rims, measure the ERD, and order the spokes.  There are plenty of tire choices in the 650B size, and I can use the wider tire I wanted for this build.

Unfortunately, this means that the VO PBP 700C rims I bought won’t work, and the spokes I ordered won’t work either.  Maybe I’ll just build the wheelset anyway and see what frame comes along that needs those wheels.  Someone might be interested in the rims, but the spokes are length-specific to the rim, hub dimensions, and lacing pattern so they will probably be with me for a while.  That’s OK.  Maybe someone will need a replacement spoke and maybe one that I have will work.  Good karma, you know.

I’m planning a 36 hole 3-cross pattern front and rear, and because of the IGH, the DS and NDS spoke lengths are almost identical.  They should be strong wheels, and perhaps a little lighter than 700C wheels.  Not that weight really matters, the IGH isn’t a lightweight hub by any definition.  But, the IGH is pretty close to the weight of a front derailleur, rear derailleur, multiple chainrings, rear cassette, shifters, and cables.

Stay tuned, hopefully the hiccups are done for this build…

The next build begins…

The next build has started.  I’m using a Univega Super Strada frame (made by Miyata) and it’s being modified as I type this.  The existing cable guides are being repositioned, while some are being removed entirely.  There is a half-lap frame break being installed in the drive-side seat stay.  Once the metal work is finished, it’s off to be painted.  I made some custom decals for this bike, I hope they look nice once they’re on the frame.

The cable guides are being repositioned because this bike is going to have an 8-speed Shimano internal-gear hub (IGH) with an internal brake, so all I need are guides for the shifter.  With no front or rear handbrakes, the frame will be very clean and uncluttered.

The frame break is being installed as I’m considering installing a belt drive sometime in the future.  Installing the joint in the frame now just makes sense.  No reason to wait and have to repaint, with all the additional work that requires.  I may not ultimately switch to belt drive, but I will have the option.

The frame paint will be a cream color.  The decals are gold, and the lugs will be outlined in gold, and then clear over everything.  I’m planning moustache bars, with sewn-on leather grips.  I have a nice Acorn bag for the front.  The shifter is going to be the J-Tek unit; the saddle will be the Brooks C17 Cambium.

I’ve got the rims, hubs, and spokes, so I’ll be lacing up the wheels soon.  I’m going to hold off on the tires until I get the frame back from being painted – that way I can decide which tires will work best.

This will be a fun bike, the IGH should mean little maintenance, and if I go with the belt drive, no greasy bits within reach.  I’ve not ridden a bike with an IGH before, so I’ll be learning about IGH maintenance and adjustments as I go.

There will be photos after I get the frame back from the metal work, and then again after it’s painted.  Can’t wait.  Stay tuned…

The LeMond’s first real ride

Today is the day.  I’m meeting a friend, Mike, at this house at 5:30pm for a ride into town, a quick bite for dinner, and back.  From my house to his is 11 miles, and town is another 5 miles from his house.  I decided to take the LeMond.  I received the headset spacers a couple of days ago and those were the last parts I needed.  The LeMond is completely finished.

The ride to Mike’s was great.  The bike is steady hands-off, pedaling or coasting.  No issues that  I could notice.  The Reynolds 853 steel frame is nice, less jarring than the CAAD8 that I usually ride.  Braking action is good, no real difference between this bike and the CAAD8.  Both sets of rims have machined sidewalls. and both brakes are dual-pivot so the differences should be minimal.  Shifting is crisper on the LeMond, probably because I should lube (or replace) the chainstay to rear derailleur housing on the CAAD8.  It’s now got about 2500 miles on the current cables/housings with no adjustments needed in that period of time.

There are some rolling hills on the route, but nothing really noteworthy.  I was really happy with the wheels.  If you’ve not read about them, these are the first set of wheels I built – laced, trued, tensioned.  3-cross on the front wheel, 3-cross NDS / 2-cross DS on the rear wheel.  The wheels are still true!  The sunlight reflecting off the polished silver rims and glinting off the stainless spokes reminds me of an old Huffy 10-speed and bicycle adventures too many years ago to count.

There is a certain amount of pride when you’re riding a bike that you built, and this ride was definitely a special one.  32 miles isn’t a terribly long ride, but it was definitely long enough for problems to surface – and there were none.

I haven’t worked out all of the details of the next project, but look for an 5-speed IGH and drum brakes.  Hint, hint.


The maiden voyage

I picked up some ferrules for the brake housings at Oswego Cyclery on Saturday.  I spent an hour or so in the afternoon and got the housings cut and installed and the cables run.  By the way, the silicone tape that fuses to itself is amazing stuff.  No adhesive to turn gooey in the summer sun, but it holds tightly.  I might have a gooey mess under the Cannondale bar wrap (I used strapping tape), but not on this bike.  This tape is kind of expensive, but it’s worth it.

The brakes are fairly simple to adjust so I got those out of the way first.  While I was adjusting, I made sure the brake pads were properly lined up on the rim and that the pads were toed in like they should be.  Adjusting the derailleurs is a little more involved, but went smoothly (ha) and shifting seems to be working well all around.  I’ll probably recheck everything after a few miles just to be sure that any early cable stretch is adjusted out.

Next is the chain.  I do like Wippermann chains and especially the Connex connector.  Put the chain on the big-big sprockets and figured out how long the chain needed to be.  I pushed out the pin with the chain tool, and the connector went in.  Finally, I installed the pedals, with just a little grease on the threads, and she’s ready for the maiden voyage.

I had measured and set the saddle in the same position as on my Cannondale, and it fits fine.  The stem that’s on the bike now is too short, but that’s OK because I’m replacing it with a polished silver stem anyway.  It is a really nice ride.  Part of what makes this bike special to me is that I built the wheels – my first-ever set of wheels.  One of the brake pads was rubbing against the rear wheel, so I centered the brake caliper and that stopped.  These Campagnolo hubs are really as smooth as butter, just a nice click-click-click as you slowly coast down the road, and the sun glints off each spoke as the front wheel turns.

I put some paint film on both sides of the headtube, and on top of the drive-side chainstay.  I will cut some film for the down tube, and that should take care of scratch protection for a long time.  So, to wrap it up, I need to replace the stem and wrap the handlebars and it’s done.  Maybe some custom spacers on the steerer, just for fun.

Photos to follow.