A well-connected place

For a cabin in the woods, this place is pretty well connected.  Fiber internet works very well, and I have the fastest connection speeds I’ve ever had.  Service has been very reliable.

The HVAC guys finally got the phone app to connect to both HVAC units, and now I can control the heat/AC from my phone.  This will be very useful when I go out of town.  No need to keep the place cooled or heated when I’m not there, saving electricity.  Then when I’m on the way back I can set the temperature back to the normal values and when I get home it will be comfortable.

My garage door opener is also connected to wifi, and I can monitor the door’s position (open or closed) from a phone app.  I can also open or close the door from the phone app as well.  If something is blocking the door it won’t close, but I’ll know that and I can have someone stop by and clear the obstruction.  The important part is that I’ll know what’s going on with the door.

There are a couple of single-pole switches that control outside floodlights and I’m considering replacing those switches with wifi switches so that I can turn the lights on from my phone.  Not sure what brand to use, would be nice to find ones that I can control from a bash script.  That would allow me to set a schedule for the lights to be on and off, and still allow me to turn them on at any time from my phone via a simple web page.

I’m not sure what else I might link up, but I’m pretty satisfied with the way things are working now.  Coupled with the video security system, this place is humming along quite nicely now.

Video security system – complete and operational

The video security system is now a “fully armed and operational battlestation.”

I installed the replacement camera in it’s final position on the west exterior wall, aimed it, and connected it to ZM.  My initial aiming of the camera was close enough to the correct position that I decided to leave it alone.

The camera is working properly with ambient light and with IR lighting.  I set up a detection zone and a preclusive zone to try and prevent false positives, but I had to move the preclusive zone around a bit to achieve the desired effect.  There may be more tweaks in the future, but for now it appears to be working well.

So the system is complete and is working very well.  I’ve defined several run states, which controls the camera modes (monitor, motion detection, or disabled) by simply changing the run state.  You can easily change the run state from the web UI, a cron entry, or from the zmNinja phone app.  Very convenient, and much simpler than changing the mode for every camera in the system manually.

I didn’t spend a lot of cash for this system, but I did invest time in configuring ZM to do what I wanted, and to install the cameras and wire them to the POE switch.  Coding a script to copy event files to Google Drive was a bit of a challenge, and it’s working.  The system is secure, and the cameras are not accessible from outside my network.

An interesting journey from zero experience to a fully functional video security system.  Lots of people that I don’t know and will probably never meet shared their experience and knowledge on multiple forums, and ultimately helped me to get this system working.

My sincere thanks to the ZoneMinder authors and contributors, and to the people that post both questions and answers on the forums.  I learned a lot.

Video security system – firing on all cylinders

I received the replacement camera from Amcrest, fairly promptly if I’m honest about it.  I plugged it into the POE switch with a patch cable, and configured the network settings, including dedicated IP address, netmask, gateway IP address which you will recall is a valid IP address but not a gateway.  I configured the video feed parameters and turned off the overlays.

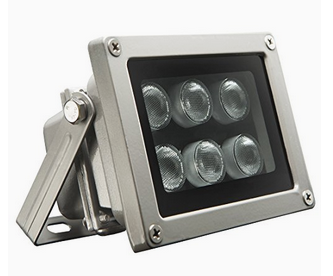
I went to the ZM console and activated the camera in monitor mode.  The camera worked fine and provided a good image with ambient light.  That night, I had a good image as well, with the IR emitters on the camera providing the lighting.  Success!

I ordered the exterior mount I need for this camera, and it arrived a few days later.  I’ll get the camera installed on the exterior wall, aimed, and then I’ll set up the detection zones.  I’ll use a preclusive zone to try and prevent a false positive when the camera switches to and from IR lighting, just like I did with the other exterior camera.

Then I will have a fully functional system, with two exterior cameras and two interior cameras, all with motion detection zones defined for the areas where there should not be motion – or to put it differently, areas where motion is something I want to know about.

The zmNinja phone app works very well, and I did some additional setup on the ZM console to make it easier to use.  You can configure the system as you want it to work when you’re away from the house, and you can save this run state as “Away”.  On the zmNinja phone app, you can change the run state to away with a couple of clicks (touches?) and all cameras will switch to modect.  I also set all cameras to monitor mode, and saved that run state as “Home”.  So when I pull in the driveway, before I get in range of the cameras, I can change the run state to “Home” and I won’t have to clear out a bunch of alerts from me driving up to the house.  Very useful and simple to manage.

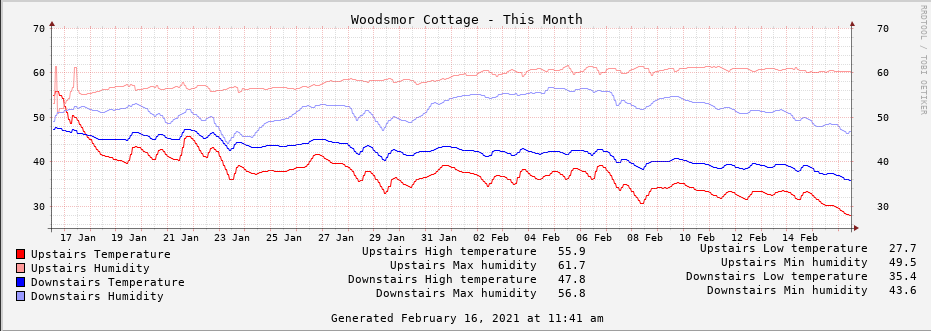
I will also set up an additional run state that I will name “Night”.  In this run state, both exterior cameras and the downstairs camera will be in modect mode, while the upstairs camera will be in monitor mode.  I don’t need an alert when I turn on a bedroom or bathroom light during the night.  I also set up a “Privacy” run state, where the interior cameras are disabled, but the exterior cameras are in modect mode.

it’s a good system, with alert files uploaded to google drive as soon as they’re recorded, emails are sent for alerts with at least 10 frames of motion, just about full control with the zmNinja phone app, and UPS battery backup for the ONT, router, and camera power.  There is a 5 port switch upstairs so that the computer running ZM has a wired connection.  The upstairs switch is on another UPS, so it will continue to run even if the mains power fails.  The laptop running ZM has an internal battery so it doesn’t need to be on the UPS.

Pretty sophisticated security for a cabin in the sticks, and without spending a lot of cash to get there.  It took some thought and work to get the system where it is now, but hopefully documenting the process will help others figure out what they need and how to get it in place.

Happy video security to you!

Video security system – a problem resolved, but tweaks needed

Remember the upstairs camera that did not provide a good image after dark?  My initial suspicion was that the IR emitters had failed, but that turned out not to be the case.  The IR emitters were working fine, the problem is that the camera did not respond to IR lighting.  The net effect is the same, an almost completely dark image that is useless for detecting motion.  I swapped in another camera, and the upstairs video after dark is now good and the camera is behaving properly.  One problem resolved.  The old camera goes back for a warranty replacement.

I installed an outdoor camera to monitor the driveway and the area in front of the garage door.  I think some supplemental IR lighting will be needed to have this camera work as well as I’d like, so I’ve ordered an IR floodlight and a power supply for it.  On my next trip up to the cabin I’ll play around with the IR floodlight and placement to see if I can improve the video image from the outdoor camera.  I’m hopeful that this supplemental lighting will also help with the yet-to-be installed camera on the west side of the cabin.

As expected, l ran into a little problem with the outdoor camera.  At dusk, the camera switches from daylight mode to IR, and in that transition period almost all of the pixels in the image change.  This large change triggers an alarm event.  Again, when the camera switches from IR mode to daylight, the changeover triggers yet another alarm event.

I didn’t want to reduce the sensitivity of the active zone, as that could prevent valid motion from triggering an alarm.  To resolve this, I created a small “preclusive” zone within the active motion detection zone.  It’s located up on the side of the building, where motion is unlikely.  The function of this zone is to prevent an alarm event when this zone changes.  Since preclusive zones are processed before active zones, this will stop alarm events during changes to and from IR and daylight modes.

I’ll continue to monitor the system and be sure that this zone is having the desired effect.  Since I can’t control the sunlight, I’ll just have to be patient and let nature proceed in it’s own way and on it’s own schedule while I test this change.

When I get the replacement camera back, I’ll get it installed and then my system will be complete.  So far, it’s working very well.  Not bad for someone who had zero experience with video security prior to this project.  I’ve learned a lot along the way and hopefully my experiences will help you.

Raspberry Pi project – a milestone

After updating the humidity correction factors and clearing the log, I’ve now got a month’s worth of temperature and humidity data in the logs.

You can see that the upstairs temperature was much higher at the beginning of the period.  (click on the image to see the full size version)  That’s because I was there and was running electric heaters upstairs.  The temperature began to fall while I was getting ready to head home and turned them off – they are unplugged when I’m not there.  Seems smart to not risk an electrical problem and a fire when there’s no need for heating.

You can also see the daily temperature swings, more pronounced on some days than others.  The swings are larger when the sun is out, as you would expect.  The downstairs swings are not as big, because the windows have blinds (and there are only 2 windows downstairs vs 5 windows upstairs) so solar heating has less of a chance to warm things up downstairs.

The humidity is still higher than expected – I’ll need to recheck the sensors with the hygrometer and see if the numbers are still close.  Even if I wind up making a change to the humidity correction factors I don’t plan to restart logging.

Yes, it’s pretty cold inside right now.  That’s what happens when the only heat is a portable electric heater.

I’m sure you won’t be surprised by this, but I also made a couple of tweaks to the heat and cold alert functions in the python logger script.  When a heat or cold alert is rescinded, the email message includes the amount of time the alert was in effect.  Just a little more polish to the project.

Raspberry Pi project – tweaks

My temperature monitoring project has been running very well, especially since I corrected the humidity sensor readings by applying a correction factor.  And the upstairs temperatures did drop below freezing a couple of days ago, so the tasks of shutting off the pump, draining the plumbing, and adding antifreeze in the traps were absolutely worthwhile.

But I decided that it would be nice to know when some threshold temperatures were reached without checking the web page.  I added code to the python3 logger script to write a file when a cold or heat threshold was reached.  It also sends an alert email message when this happens.  The web page that displays the temperature and humidity graphs looks for this file and indicates that a threshold has been crossed for cold or hot temperatures.

It seems the DHT22 sensors can waver back and forth a few tenths of a degree, and if that happens right at one of your threshold values, you will get an annoying collection of emails.  To address this, I implemented a buffer mechanism.  Now, the heat/cold alert will only happen when the temperature crosses the threshold and stays there for 3 consecutive checks.  Since I’m logging the values every 5 minutes, that means the temperature must remain either above (heat) or below (cold) for at least 10 minutes before an alert is sent.  When the temperature rises above the cold threshold, it must remain above the threshold for 3 consecutive checks before the alert is rescinded.  Rescinding a heat threshold works the same way.

I also added some code to rescind any existing cold or heat alerts when the logging daemon is restarted.  Since you can edit the threshold temperatures, it seems reasonable to start clean.  If an alert should be issued, it will take just a few minutes to get past the buffer mechanism.

So far this is working well.  On my next trip up there, I’ll recheck the sensors using the hygrometer and see if any alterations to the correction factors are needed.  If they are, it’s a trivial change to make.

Video security system – a problem

I’ve installed the two indoor cameras, and unfortunately there’s a problem with the upstairs camera.  This is what the image looks like right before it goes completely black.  The IR emitters aren’t working.  So at night, the image is completely black.  Not terribly useful.

I used the reset link on the camera’s web page, but that’s a software reset, not a hardware reset.  I’m sorry to say that didn’t resolve the problem.

I contacted Amcrest, and explained my problem.  The response suggested that I would need to do a hardware reset, since the software reset didn’t help.  To do that you need to disassemble the camera so that you can access the motherboard, and press a switch on the motherboard.  That will reset the login password, IP address, and video stream configuration.  A nuisance for sure, but maybe it will resolve the problem.  Honestly, I have my doubts – and can I trust a camera that required a hardware reset to restore proper functionality?  When will the next hardware reset be required – a week or a month later?  I had him send me an email with the hardware reset instructions – disassembling the camera voids the warranty, so I wanted some way to demonstrate that I took it apart at their direction should there be a future problem with it.

I’m 5 hours away from the cabin, so I don’t just run up there to try every resolution immediately.  I’ll try the hardware reset on my next trip.  If it works, great – but as I said earlier – it will still be suspect.  If not, I have a plan B.

I’ll connect both uninstalled cameras to the POE switch with patch cables and make sure that they work properly and that the IR emitters are behaving.  I hope that both remaining cameras work properly and I’ll pick one and replace the upstairs camera with it.  I’ll need to reset the IP address, which is easy enough, and verify the video stream parameters as well.  Then I’ll have both indoor cameras working properly, and I can install the remaining good camera in it’s place on the roof soffit.  The bad one will be sent back for a replacement under warranty.  It’s not a difficult install, mounting the camera is pretty easy.  Running the cat6 cable is a little more involved but again not too bad.  Since I borrowed a cable tester from a friend (thanks Bob) I can make sure that the cable connectors are properly crimped on and that the cable is good.  Then I plug it into the POE switch and set it up in ZM.

I’ll leave this camera in Monitor mode for now, since it’s an outdoor camera I’ll need to set up detection zones and ignore zones to try and minimize false positives.  I don’t expect this will be a set-it-and-forget-it process, I think I’ll spend some time tweaking this before it’s reliable.

I’m curious what will show up when I change the mode to Modect and start recording events.

Raspberry Pi project – some conclusions

After making the changes discussed earlier and monitoring the values and the graphs of those values, I can draw some conclusions about the interior conditions at the cabin.

First, conditions downstairs are more stable than the upstairs, both temperature and humidity do not fluctuate nearly as much as they do upstairs.  Makes sense as there are only two small windows downstairs, while the upstairs has five windows.

Second, it is cooler upstairs than downstairs – but a larger difference than I would have expected.  It is 4-5 degrees cooler upstairs, and more humid by 4-5 percent.  Some of the humidity difference is attributable to the temperature difference, but not all of it.  Solar heating during the day does warm the upstairs more than the downstairs – presuming that the sun can supply the solar energy.  On cloudy days, you’re on your own.

But my main interest was to see how close to freezing it gets inside, with no heat source to maintain a set temperature.  I can’t risk frozen pipes, so I drain the water system and put RV antifreeze in the traps and the toilets.  Maybe I’ve been wasting time and RV antifreeze when it isn’t really needed, but now I have a reasonably reliable way to monitor the situation.

Raspberry Pi project – correction factors

As I mentioned earlier, I was suspect of the humidity values returned by the DHT22 sensors.  So I used a hygrometer to get a separate reading – not that the hygrometer is perfect, but my experience over the past couple of weeks was that it agreed with another hygrometer, the temperature and humidity were consistent, and believable for cool winter conditions.

I placed the hygrometer close to the sensors and gave it a couple of hours to settle in.  The temperature matched within a degree, so that’s great.  Not so great on the humidity side, I applied a correction factor of -16 to get the reported values in the ballpark.  Now the sensors are both reporting values that match the hygrometer within a percent.  A significant improvement.

To move one of the sensors upstairs, I took some cat6 cable and soldered the twisted pairs together to make a 4 conductor cable.  One conductor won’t be used with the DHT22 sensors, but I will need it for the BME280 sensors when I swap them.  I ran the cable upstairs, which took a lot longer than it took to type this sentence.  It’s a long story, don’t ask.  Connected everything up and booted the pi.

Upstairs temperature was fine, but the humidity value (again) was off the charts.  So I decided to try the +5v pin instead of the +3.3v pin on the pi for the upstairs sensor, as the connecting wire is now about 15 feet long.  The humidity value came back to reality and has stayed that way for a few days now.

I’ll leave the DHT22 sensors in place for now and see how they behave.  I am definitely going to swap the sensors, but there are higher priority tasks to do, especially since the current sensors seem to be behaving for now.

Raspberry Pi project – swapping sensors, part 2

Now that I’ve laid out my reasons for trying a different type of sensor, let’s dig in.  We need a couple of libraries that the DHT22 sensors didn’t need, so we should go ahead and get them installed.

First, let’s install the smbus2 library. At a command prompt, type:

sudo pip install smbus2

Now, let’s install the library for the SME280 sensor. At a command prompt, type:

sudo pip install RPi.bme280

That takes care of the additional libraries we’ll need for the python script.

Now, let’s connect the sensors to the Raspberry Pi. I’m using the model 4 rev B, so I have a 40-pin GPIO header. We’re going to use six pins to connect our two sensors. We’re going to connect each sensor to it’s own 3.3v source and it’s own ground. We’ll use RPi4 pins 1 and 6 for 3.3v and ground for the upstairs sensor, and pins 17 and 9 for 3.3v and ground for the downstairs sensor. We’ll connect the two clock lines together and they will connect to RPi4 pin 5; then we’ll connect the two data lines together and they will connect to RPi4 pin 3.  Since the two sensors will have a unique address on the bus, we can connect them electrically but interrogate them separately.

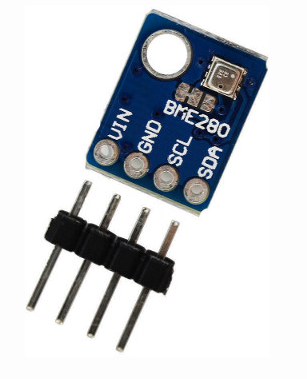
We also need to make a small alteration to one of the sensors to change it’s address on the i2c bus.  In the following image, the red mark indicates the we are removing the connection between the left and center pad, and adding a connection from the center pad to the right pad.  We are only altering one of the two sensor boards in this manner.  The unaltered sensor will have bus address 0x76, and the altered sensor will have address 0x77.  The test script below is coded so that the upstairs sensor is the unaltered one, and the altered sensor is the downstairs sensor.

This sensor test script interrogates the sensors and then displays the returned values separately, followed by a string containing the data. Note that python is sensitive to indentation. I’ve added a line of code to convert the celcius temperature into fahrenheit. This line is optional. The full code for our test script follows.

#!/usr/bin/python3

import time
import smbus2
import bme280

port = 1
upstairs_addr = 0x76
downstairs_addr = 0x77
bus = smbus2.SMBus(port)

calibration_params_upstairs = bme280.load_calibration_params(bus, upstairs_addr)
calibration_params_downstairs = bme280.load_calibration_params(bus, downstairs_addr)

#exit()

while True:
    # interrogate the sensors and supply the calibration data we obtained earlier
    upstairs_data = bme280.sample(bus, upstairs_addr, calibration_params_upstairs)
    downstairs_data = bme280.sample(bus, downstairs_addr, calibration_params_downstairs)

    # the compensated data
    print(upstairs_data.id)
    print(upstairs_data.timestamp)
    print(upstairs_data.temperature)
    ftemp_upstairs = upstairs_data.temperature * 9/5.0 + 32
    print(ftemp_upstairs)
    print(upstairs_data.pressure)
    print(upstairs_data.humidity)

    # in string format
    print(upstairs_data)

    # the compensated data
    print(downstairs_data.id)
    print(downstairs_data.timestamp)
    print(downstairs_data.temperature)
    ftemp_downstairs = downstairs_data.temperature * 9/5.0 + 32
    print(ftemp_downstairs)
    print(downstairs_data.pressure)
    print(downstairs_data.humidity)

    # in string format
    print(downstairs_data)

    time.sleep(15)

Once this is working and successfully retrieving and displaying the sensor data, we’ll move on to the changes needed to our data logger script.