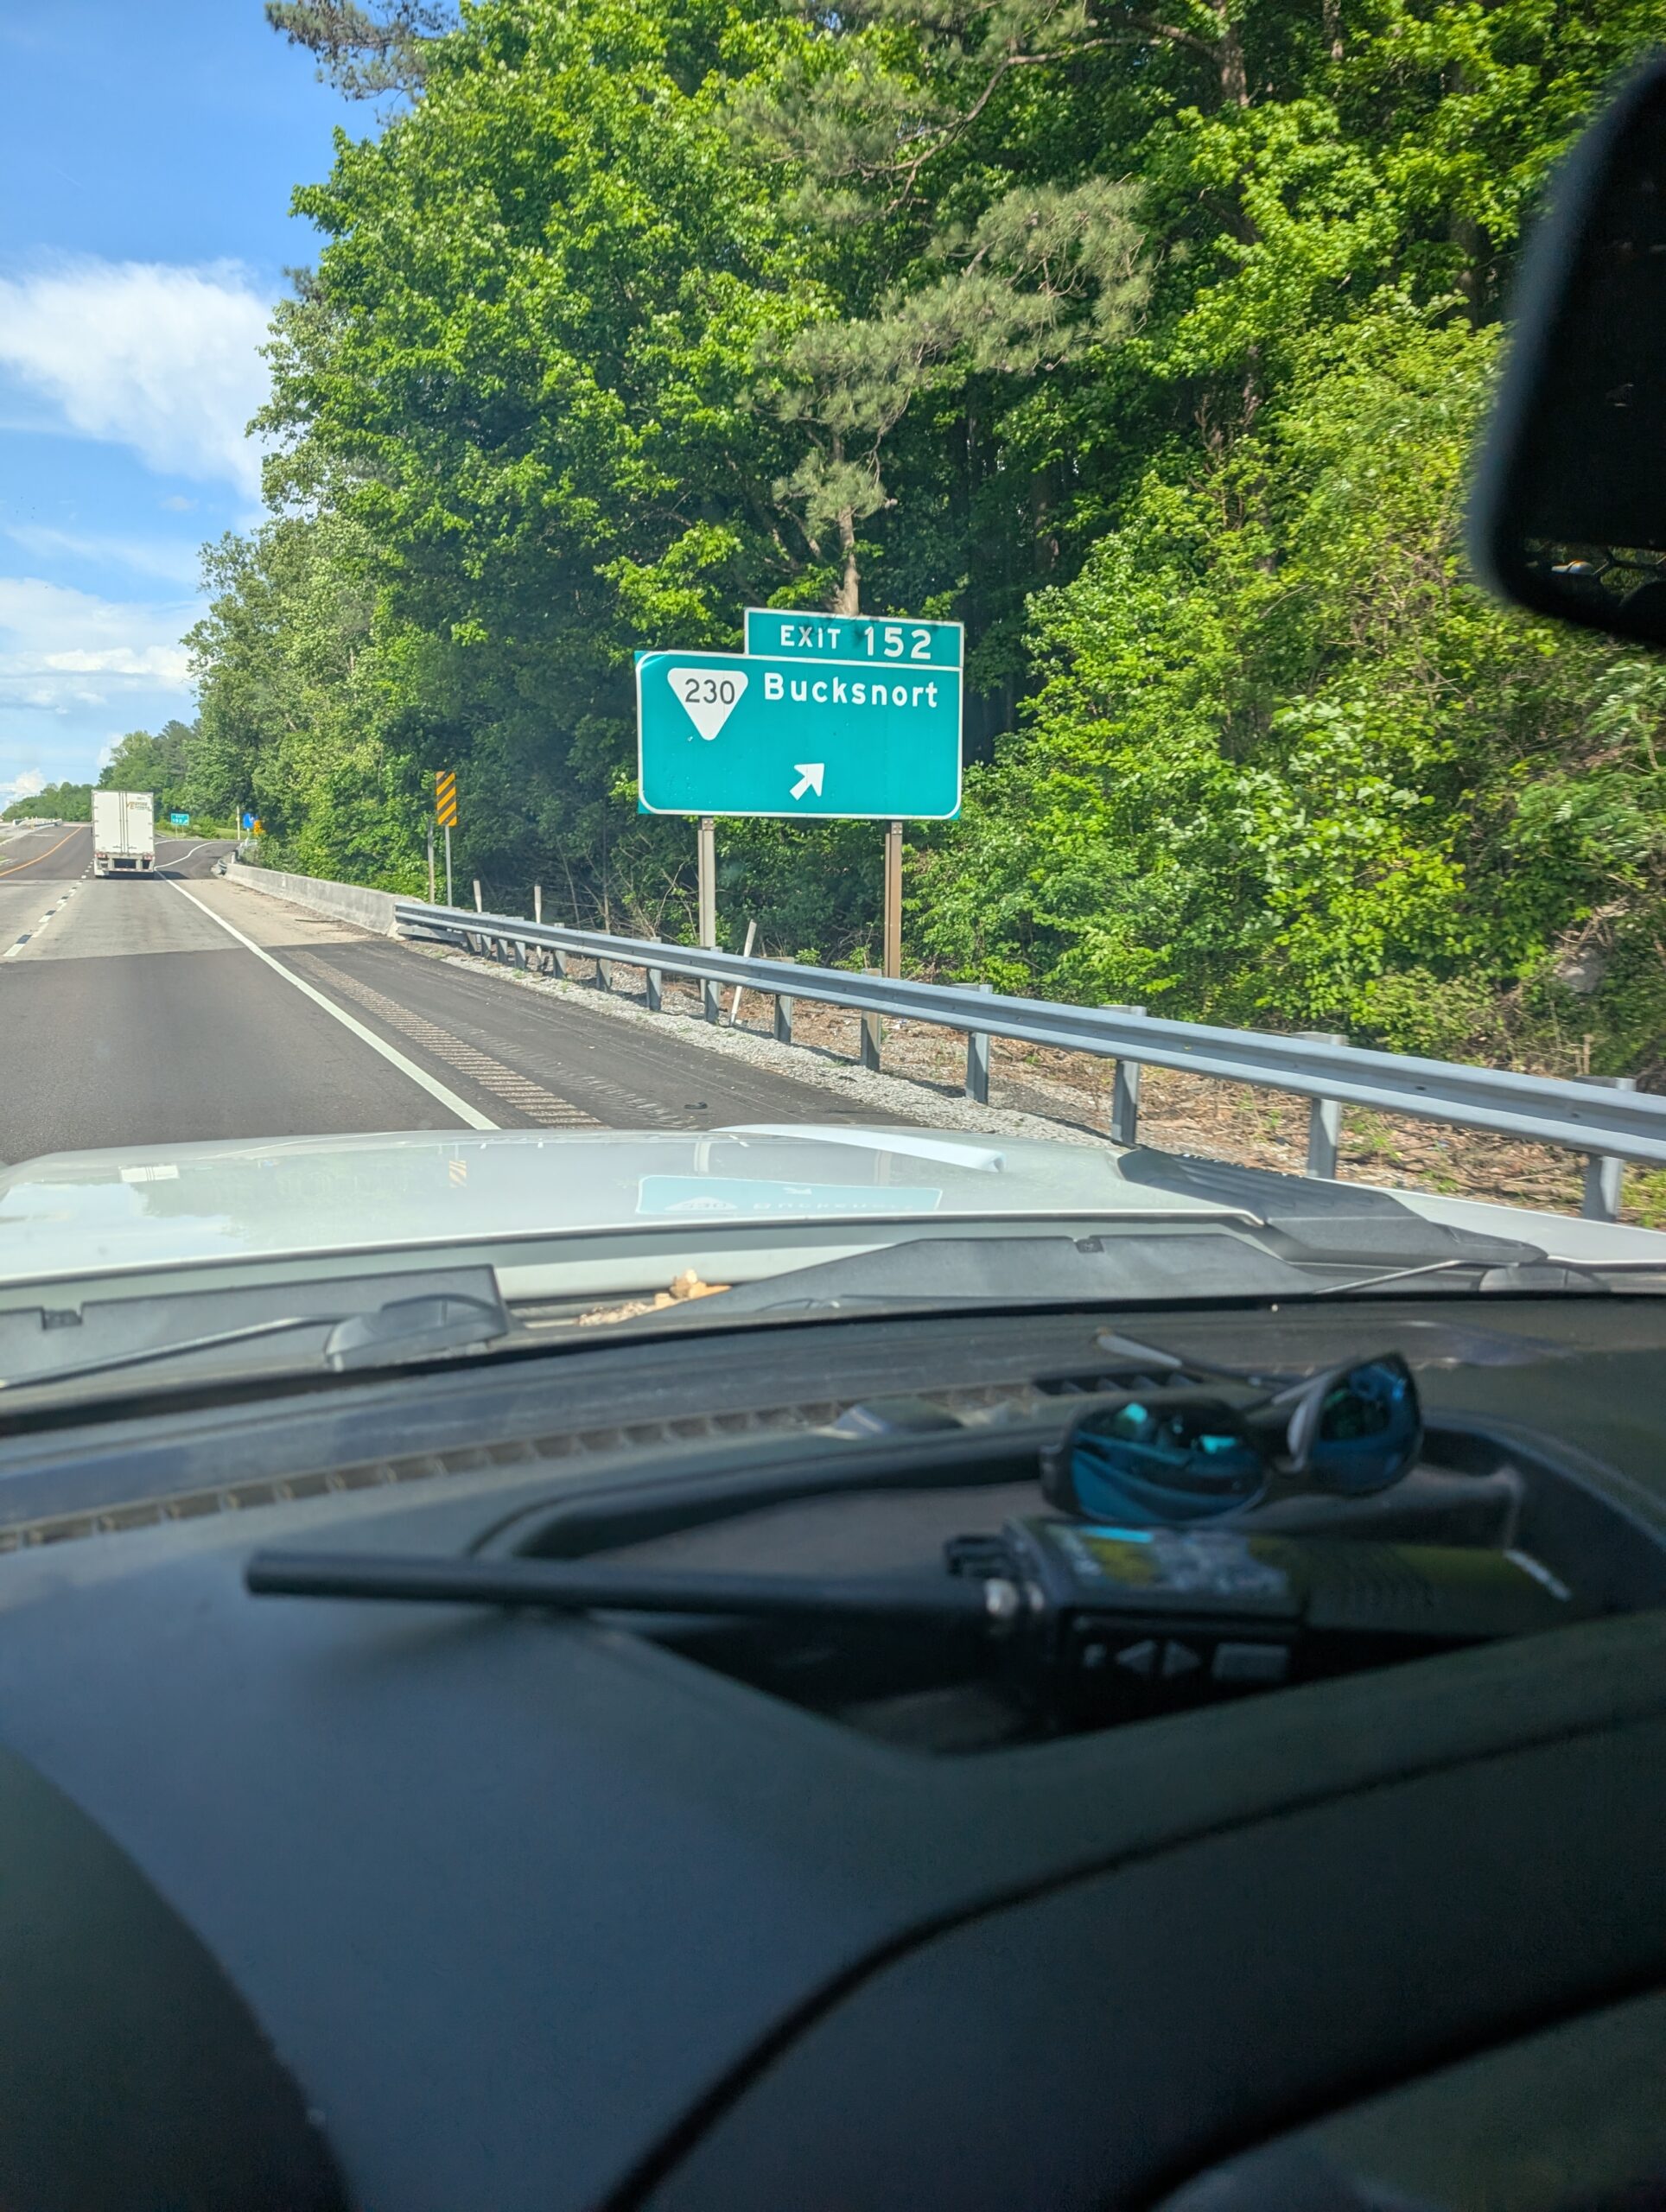
A great name for a small town.

adventures off the beaten trail
I decided that the Salsa Woodchipper 2 is just too wide for me. 46cm wide at the levers is very wide, and the lower part of the drops flares out even more. I have a set of 42cm Deda bars and swapped them. The next ride will tell me if the bars and levers are in the right places.
UPDATE: The bar swap worked fine. Better feel for me, so they’ll stay.
I bought some replacement lever hoods since one of them has a tear already. They’re on the way here, and it should be a fairly easy job to swap them. Then once the bar and lever positions are set, I’ll wrap the bars.
UPDATE: Replacing the lever hoods turned out to be a bigger project than I had anticipated. I wound up removing the lever blade to get the hoods installed. But it’s done, and the new hoods are much tighter to the lever body than the old ones. The bars are wrapped, and I’m calling it done.
I took the pedals off the Parlee Z3 (a set of Shimano M8120 SPD pedals) and put them on the Focus. I have a set of M9120 SPD pedals on the way, they will go on the Parlee when they arrive.
UPDATE: Pedal swap complete, and the Parlee has the M9120 pedals installed.
The bar swap made a noticeable difference in the way the bike rides. The pedals didn’t make a a big difference, but these M8120 pedals are practically new, probably less than 200 miles on them. All of my bikes have SPD pedals.
For those of you that followed the build project, here are some photos of the finished bike.
After removing the old hoods and swapping handlebars, installing the replacement hoods turned out to be a bigger job than I expected. But with good weather I wasn’t going to miss a chance to get out and ride, even if that meant riding without hoods or bar tape. My riding buddy also happens to be my mailman. He noticed the packages coming from bike shops, and we got to talking about riding. We met up for a ride at the Muscatatuck park in North Vernon on a really nice Sunday afternoon.
We headed south out of town and came to an intersection where continuing south was a gravel road. Riding a gravel bike, going straight seemed the appropriate choice. The bike rode fine, I didn’t fall off, and I got some mud on the bike (and on me as well). So the Focus Mares is officially a gravel bike now.
We worked our way east and south to the Commiskey Corner Store, but they were closed. Oh, well. We went west on 850S for a ways and then headed back north towards Vernon. Greg met his wife in Vernon, and I continued up IN-3/7 to the east side of the park. Riding through the park had some unexpectedly steep climbs, almost 18%, and then I was back to the truck.
A good ride, no bike issues – except for the unwrapped bars and shifters with no hoods. Made my hands a little achy, but I’ll get the hoods on and the bars wrapped and that should take care of it. That’s my task to work on next.
The weather has been somewhat unpredictable lately, so the maiden voyage has been postponed a couple of times. Today is the day – sun and a high temp in the 50s.
I think the handlebar and levers are pretty close to their final positions, but I haven’t wrapped the bars yet. Today’s ride will tell me if any adjustments need to be made.
I’m going to try 45F/50R tire pressures for today. That’s probably higher than I will run at Unbound Gravel, but it’s just a starting point, not the end.
I’m really looking forward to the ride. It seems like this build has taken a long time, but in reality it has not. Mounting the tubeless tires was a frustrating exercise, but I learned how to get it done, so that’s a plus. The hydraulic brakes were a bit frustrating for a couple of reasons. First, the Shimano BH90 hose kit didn’t have enough hose to do the front and rear brake. Coming from brake/housing kits for rim brake bikes that have enough housing and cables to completely replace both brake sets, this was really annoying. There’s not really much of an excuse to short the consumer in this way. Secondly, there are tools that make the job much easier, but they aren’t cheap. Since this is (hopefully) a one-time task, I chose to have a bike shop install the hoses.
I’ll report back after the ride, and add some photos too. Once I get the bars and levers in their final positions, I’ll wrap the bars and this build will be done.
No major issues during the ride, but I had to tighten the levers after the first mile or so. They would twist inwards but not outwards. Took a couple of minutes but after that all was good. The bike rides well, the 45F/50R tire pressures worked well for pavement. Will probably lower the pressure 5 psi or so for gravel and see how it rides.
The bar position is fine, no change needed. The bars are wider than I used to, and the lower part of the drops twists out even further. I’m not used to them yet, but riding in the drops wasn’t uncomfortable, just unusual. Give me some time on this one. I have a drop bar that’s 42cm wide, and I might decide to use it instead.
The pedals aren’t the ones I will use going forward but I had them so I used them. Pedals are pretty much pedals. No issues shifting or braking, I did a couple of hard stops to heat up the pads, and then a couple of long brake applications as well. No squealing or chattering – this is with the organic pads (not the sintered pads). The BB is working well, no squeaking at all, just smooth rotation as you’d expect.
The chain lube seems to be working very well. No noise from the chain, and wiping a finger on the chain after the ride showed clean. No black streaks like wet lubes generally leave. One ride doesn’t make a very complete evaluation, but the next few rides should give me a pretty good idea if it will live up to the advertising and the online reviews.
Sorry, no photos tonight. It’s too dark. I’ll take some first chance I get and post them.
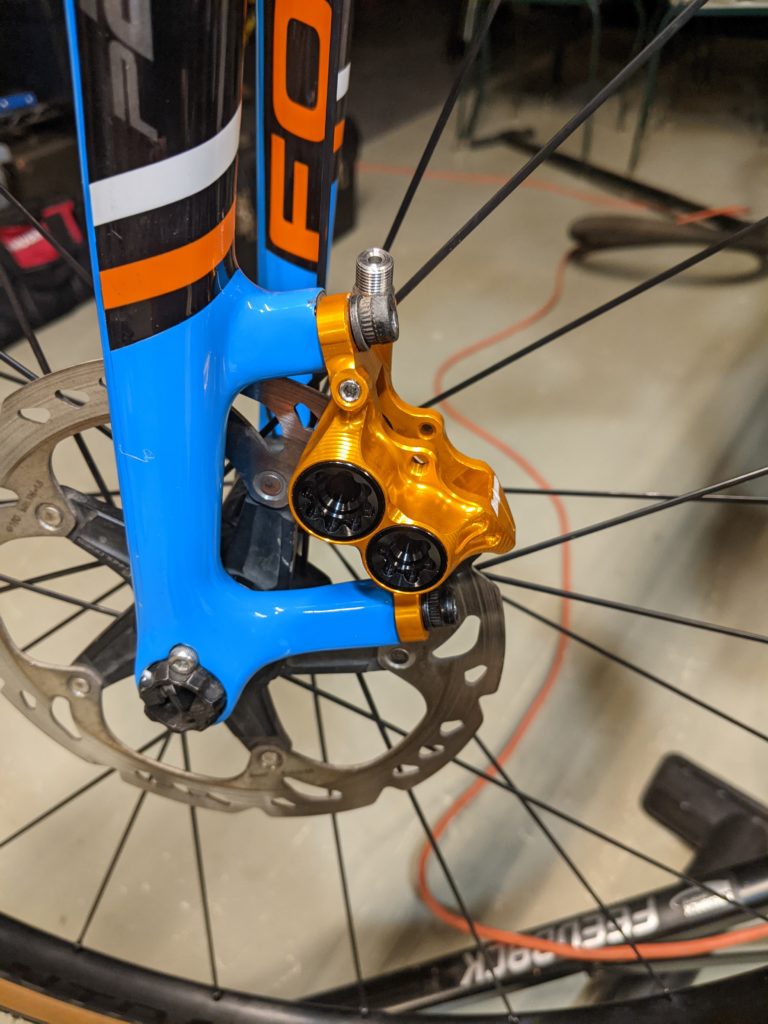
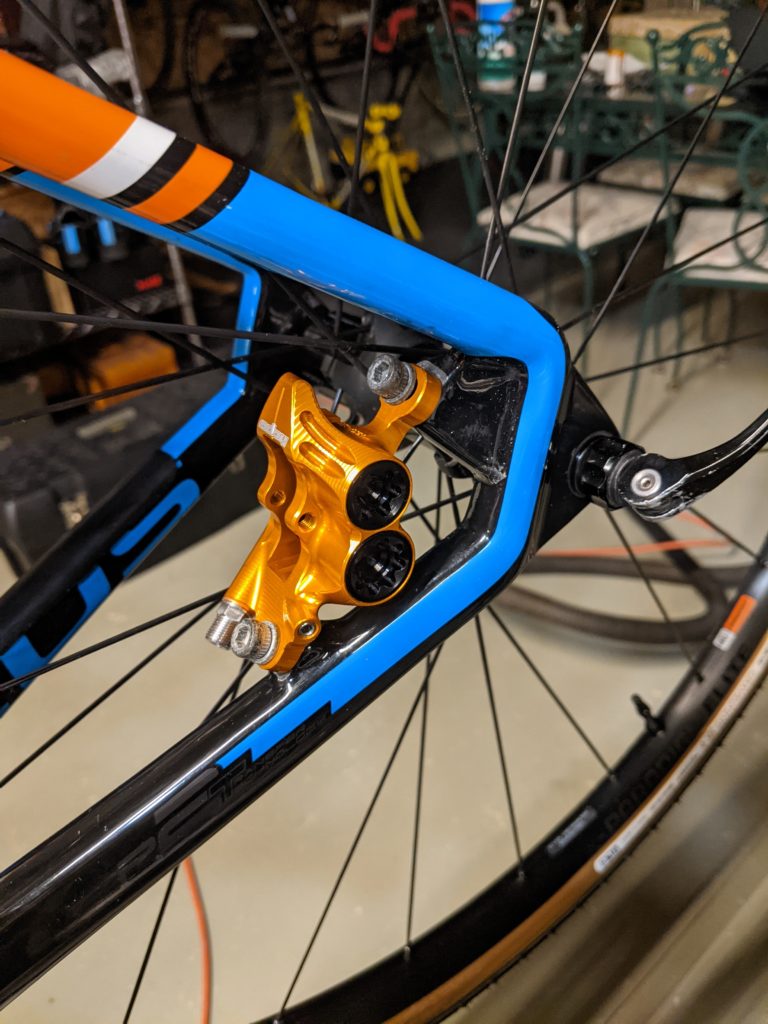
Now, on to the brakes. I decided to replace the Shimano calipers with Hope RX4+ calipers. The Hope calipers are 4 piston units, machined in a single piece of alloy, and are well regarded as quality calipers.
Spending some time researching them, and found that they have an M5 port for bleeding, whereas the Shimano calipers use an M4 thread. When I opened the box, it was great to see that they included a syringe and fitting for bleeding the brake system. Pads are included as well, both sintered and organic – I will install the organic pads.
I also decided to install new BH90 brake hose at the same time. I have the Shimano brake bleed kit which includes a cup reservoir to use on the levers so that extra fluid can be pushed out the top of the system when removing air bubbles. Coupled with the Hope syringe and fitting that should be all that’s needed to maintain the brakes. I’m using Shimano brand mineral oil as well.
I had Columbus Cycling replaced the brake hose for me, since they have the tools to do the job. While I like tools, they aren’t cheap and I don’t see this task as something that will need to be redone very often, if at all. It didn’t take them long to finish that job.
Bleeding the brakes was a bit trickier. The Hope calipers are known for hiding air in the pistons and can be difficult to get a firm lever. They have a process to use to get the brakes bled and working properly. I followed their procedure and the front brake is firm and works well. The rear brake works, but the lever isn’t as firm as the front. I’ll try rebleeding it and see if I can improve things.
I was able to firm the rear lever up a bit more, but it’s still not as good as the front. I’ll try again after a ride and see what I can do.
Getting close to the finish line is upping the anticipation for the maiden voyage.
Two things remain – Installing the Hope RX4 calipers and new brake hose, and finishing up the drivetrain.
The BB seemed a little rough when I installed the crankset and set the preload, so I decided to replace the BB. I chose the Wheels Mfg PF30-Shimano BB.
Removing the RaceFace BB was fairly simple. I didn’t have the bike-specific removal tool, so I improvised with a 3/8 socket extension and a ball peen hammer. A few taps at a time, working my way around the cup and the NDS cup came out. Same for the DS cup. The BB had quite a lot of dirt in it so I cleaned that out. The missing grommet for the FD DI2 wire gets the blame for the dirt in the BB. I definitely need to get grommets to seal up the DI2 wires and their openings in the frame.
Installing the Wheels Mfg BB was pretty straightforward. I used Mobil 1 Synthetic Grease on the threads, cups, and the first half inch or so of the BB shell. The DS cup pushed in without tools, and the threads that join the NDS and DS cups mated up easily. I have wrenches for the BB, a flat one and a 3/8 drive tool that works with a torque wrench to complete the installation. I torqued the BB to 45nm, and that’s the BB replaced.
Then I reinstalled the crankset and bearing seals, and set the preload. Bearings are very smooth, much better than the old BB. Now that the crankset is installed, I can mount the FD and plug it in. The new, full length chain went on next, and I left it at full length for now.
Testing the shifting is next. I activated the synchro-shift mode, and set up the RD first, using the adjustment mode to line the jockey wheels up properly under the cassette cogs. I set the hi and low limit screws and that’s all the RD needs. The FD is pretty much the same. There was more extra links than I expected, so I shortened the chain to big-big plus two rivets. Shifting up and down is working well.
I’m trying a new chain lube. Tru Tension All Weather lube. It’s wax based and contains tungsten disulfide. Reviews were positive and if it works for me I’m hoping to eliminate the chainring tattoos I seem to get with regularity.
I soaked the chain in mineral spirits to remove the factory oil, then blew it out with compressed air. Installed the chain dry, and applied the lube. It dries to the touch in a few minutes, and is not sticky or oily once it dries. I’ll follow up after a few rides to let you know how it’s working.
And we finally get to the tubeless tire part of this project. Having zero experience with tubeless tires, I read and watched some youtube videos. Somehow it looks a lot easier than my reality turned out to be. I’m not really surprised, there are abundant stories about adventures with tubeless tires.
I picked up the Muc-Off tubeless tire kit. It includes sealant, rim tape, and valve stems and cores. It’s a good value and the pink sealant is, well, PINK.
I decided to mount the Maxxis 40mm file-tread tires. They actually mounted pretty easily, but they wobbled left and right. The rims are true, so the problem was with the tires or the beads weren’t seated properly all the way around. I tried spraying soapy water on the tire bead and rim, then reseating the beads. It helped a little but not enough. Finally I gave up on them after multiple attempts and took them off. So much for Plan A.
Plan B was to mount the GravelKing SK+ tires I bought to ride at Unbound Gravel. They went onto the rims easily enough, and I did the soapy water thing again. The beads would not seat at all. I need a plan C, or more experience, or possibly both.
Given that experience is what you get when you do things wrong, I came up with Plan C. That was to remove the tubeless valve stem, and put an inner tube in and inflate it. Of course, the beads seated right away and the tire is rolling straight and true as it should. I decided to leave the tire mounted with the tube, under pressure, for a day or so to help convince the beads that this is their new home.
A day or so turned into 2 days. A winter storm is imminent, so making sure everything is ready including stocking up the pantry and refrigerator/freezer took priority. That’s done, so I’m fresh out of excuses and delays.
I took the tube out and of course, both beads came loose. I put the tubeless valve stem back in, sprayed the beads with soapy water, and the compressor seated the beads instantly. Put the valve core in and pumped it to 80 psi. I let it sit under pressure for a while, then let the air out and used a syringe to put approximately 70ml of the pink Muc-Off sealant in. Then cleaned the soapy water off the spokes and rim, and the rear wheel is ready for brake disk and cassette. Finally, success. Now that I know what works (for me, anyway) the front tire should be a bit less of a mystery.
The front tire was about as easy as it could have been. The beads seated instantly with soapy water and the compressor, so I didn’t need to use the inner tube. Same process as with the rear wheel, and the front wheel is ready to go.
I definitely need to pick up an air tank that I can fill either at home or at a gas station. Makes re/seating beads very quick and easy.
A slight detour was necessary after the last post. While I was going over the rear wheel and checking spoke tensions, I saw that some of the bladed spokes were twisted at the nipple end by the rim. Knowing where I will be riding this bike and the distance I’d have to walk if I had spokes break, I decided to relace the rear wheel with new spokes and nipples.
I ordered spokes and a tool to hold the bladed spoke while tightening the nipple, since these are straight pull spokes and the hub end can easily spin around until the tension increases. Waiting for them to be delivered, I removed the rim tape and the old spokes and nipples. They arrived in just a few days and I checked the spoke lengths – spot on.
It is quite easy to lace wheels with straight pull hubs, since the spoke literally points directly to the proper position on the rim. The only change from a J bend spoke is the need to use the spoke holder to prevent the spoke from twisting as you tighten things up. Before tightening things up, I checked the specs for the rim and found the proper range of spoke tension. I use a Park Tool TM-1 to monitor spoke tension, so I checked the conversion table to see what the proper tension would equate to on the tool’s scale.
The wheel came up to tension nicely, no hops, and almost perfect lateral true. A few tweaks to the dish and the lateral true, and the wheel is finished. Next is rim tape, a valve stem, and tire mounting awaits.
Now that the frame and fork have been cleaned, polished, and waxed, it’s time to apply some protection to the frame. I used a strip of 3M paint film 2″ across on the bottom side of the downtube, from the BB shell opening up to the headset. On the top of the DS chainstay, I used a piece of 3M 2228 rubber tape to protect it from chain strikes. You have to know the paint film is there to see it, and the rubber tape is unobtrusive as well.
Now to begin the reassembly. The fork is first. Cleaned the bearings, reapplied grease, and put a thin layer of grease on the fork near the bridge and also where the top bearing will sit. Greased the inner and outer races of both bearings and inserted the fork. The cap goes on next, followed by the spacers and the steerer-mounted junction “A” mount. Then the stem, and the nice orange anodized stem cap from WolfTooth Components. A little aligning, tightening, rechecking alignment, and the fork is back on.
I reinstalled the disk brake calipers but didn’t tighten them down. They’re going to be replaced by a set of Hope RX4+ 4 piston calipers, but I don’t have them yet and I didn’t want the existing calipers banging against the frame or fork.
The handlebars went back on next, and the angle of the drops is at least reasonable, I might wind up tweaking the position after a ride or two. The shifters are back on and set as best I could estimate. There’s a distinct possibility of changes to the lever position after a couple of rides. The bar wrap will wait until everything is in a good position and the brake hose replacement is complete.
I added a Shimano BT module to the DI2 system in the seat tube, just as I did on the Parlee I finished a month or so ago.
The 46/36 chainrings were cleaned up, along with the crankarms and spindle, and they’re back on with the bearing preload set.
I’m considering replacing the FD and RD with GRX versions, but haven’t made a final decision on that purchase yet. They aren’t cheap, so I’m wembling a little on this purchase. People that recall the HBO show Fraggle Rock will recall what wembling means.
Two bigger jobs remain, both of which I have no experience with. Replacing the calipers and brake hoses, then filling and bleeding the air from the braking system. The second is mounting tubeless tires and putting sealant in the tires.
If you see a photo of me covered head to toe in sealant you can surmise that the tire mounting was not entirely successful.
Started taking components off the frame and fork. The previous owner did a great job packing the bike for shipment, even removing the front and rear derailleurs and the crankset. There wasn’t a lot left for me to remove after the packing material and pipe wrap were gone.
The protective film on the underside of the down tube proved a real nuisance to remove, because the film came off but left the adhesive on the downtube. That adhesive was tenacious. A little heat and some patience (which I don’t always have in abundance) finally took care of it, but not before I wound up with blisters on both thumbs from working to remove the adhesive. I also removed the protective rubber on the top of the DS chainstay, but I’ll replace that after the frame is polished and waxed. Polished and waxed makes it easier and faster to clean when it gets dirty.
I’ll use polishing compound on the fork first, just because it’s a smaller job than the frame. There are a couple of scratches on the fork that I think will need to be fixed before the final polishing and wax. Not bad though, I’m just particular about maintaining my bikes. Ask anyone that knows me – they’ll say it’s not a surprise.
Next I went over the frame, cleaning and seeing scratches and rubs that will need to be polished out and/or repaired. I only found a couple, so I’ll handle those at the same time as the fork. It will take a few coats of lacquer over a couple of days to get them built up to the level of the clearcoat. Then some 1000 and 2000 grit sandpaper will clean them up nicely.
Change of plans – I’m not going to touch up the scratches, or a couple of paint chips either. It’s just not worth doing on a gravel bike that will get ridden on gravel. More scratches and paint chips are inevitable, so I’ll save myself some time and polish the frame and fork, then wax them and move on.