Biking accessories

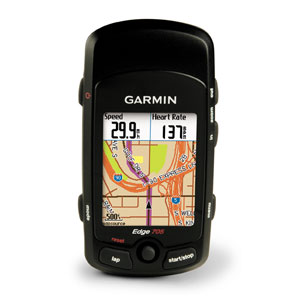
I thought I’d talk about some cycling accessories that I actually use, instead of the “gimmicks” that seem to be hawked these days. I’ve got a Garmin Edge 705 cycling gps that works really well. It has a color screen, and you can customize the display page to include what you want to see while riding. It’s a nice package. Of course, if you just want to record a track while riding, just hit the start button and put it in your pocket. Either way, don’t forget to hit the stop button when you’re done. I’ve forgotten that more than once. Maybe it was twice, I can’t remember.

The RideWithGPS website works very well to manage your courses and ride history, and speaks Garmin very well. You can easily plan, edit, and export routes (courses in Garminspeak), and upload history from your rides. You can also turn a ride into a route, if you want to share it with cycling friends. If you opt for one of the subscription plans, you can add advance notification of turns to the exported file.

Back on the 705, you can easily upload routes to the “Courses” directory (as a file with a “.tcx” extension). and download the results from the “History” directory, also with a “.tcx” extension. You can then upload the .tcx file to RideWithGPS to look at average speed, cadence, distance, and climbing/descending info. It also shows the gradient, but I can’t speak to the accuracy of that info.

I use OpenStreetMaps on my 705, and they work very well. There’s no need to pay the “Garmin Tax” and buy one of their maps. You can select the areas you want, and download them. Uploading the map file (gmapsupp.img) is simple enough. If you use these maps, please support this worthwhile project.

if you want a tutorial on using OpenStreetMaps on your Garmin device, go to DCRainMaker’s website and follow the directions. It is literally as simple as he says. Additionally, his site is a great resource for bicycling information and product reviews in general – it’s well worth the time to read.

If you are looking for turn-by-turn navigation, cadence, speed, and other information, the Garmin 705 is a good choice. Since it isn’t the latest and greatest unit out there, the prices are very reasonable – around $100 give or take, usually including mount and speed/cadence sensor.

Compared with the $1000+ units, the Edge 705 is a very smart choice if it’s functionality meets your needs. If you want the latest gee-whiz bells and whistles, then I guess you’ll have to pay for that.

if you have questions about working with routes and ride results, or using OpenStreetMaps on your 705, drop me a note and I’ll try to help.

UPDATE: I ordered a GUB GPS mount off ebay for my 705, and it fits and works really well. It clamps on the handlebar next to the stem, and has a gopro-style mount underneath for a camera or a light. A nice, functional accessory.

A new GPS

I just purchased a DeLorme PN-60w + SPOT from Amazon.com for $100 less than I have seen elsewhere. I have a fair amount of experience with Garmin GPS units, over the years I’ve had a 2610, 2730, 478, and a Nuvi 760. I’m getting tired of the roadblocks Garmin puts in the way of using the maps that I’ve paid for – and it REALLY irritates me that they would suggest that I need to buy the maps AGAIN to use them on my PC to create routes for the GPS. Exactly how many times do they expect me to buy the same maps? I got around that little problem, but I’m voting with my $ and Garmin lost the election.

I just used the Nuvi on the eastern part of the TAT and it worked very well. In a waterproof bag (as the unit is NOT waterproof) it routed us reliably on the trail. It doesn’t understand tracks at all, but it does keep a tracklog. I wrote a small program to convert a gpx track file to a route, and then the Nuvi can use it. It recalculates the route when it is loaded, but if you use enough trackpoints when defining the original track the route will follow your track exactly. For the money I spent, the Nuvi has worked well.

I have an original SPOT tracker (the orange one) and used it on the trail as there are long stretches without cell coverage and peace of mind for my wife while I’m out riding is a real benefit.

But it was time to move to a unit that really handles tracks well. So I’m waiting for the PN-60w to get here. I just need to swap the SPOT tracker to the SPOT communicator in my SPOT account and it should be ready.

I will have the winter to set up the tracks for NM, CO, UT, NV, and OR. Using it in the truck will let me learn the track and route functions so that I’m familiar with it when spring comes and the trails call.

Stay tuned for the next installment.

Doing the track thing

While preparing for the TAT ride, I’ve been creating gpx files containing trackpoints for navigation.   However, the Garmin Nuvi 760 doesn’t know what to do with a gpx file containing trackpoints, so it just ignores it.   When uploading the file to the gps, it tells you that the upload was successful, but it wasn’t.   The file isn’t there.   That’s annoying.   If the upload process is smart enough to determine that it can’t   handle files containing trackpoints, then it’s also smart enough to tell me that it can’t handle them.   Sloppy (or lazy) programming seems to be the culprit here.

To use the handcrafted tracks on the 760, you have to convert them to routes.   I wrote a small script to do that (a gpx file is just an xml file with some special element names) and now the 760 accepts them and navigates the route without complaint.

But it isn’t a track, it’s a route, and gps devices like to recalculate routes to fit their own idea of how you should get from A to B.   With enough trackpoints (now routepoints) you can prevent that, but I shouldn’t have to.   I need a gps that understands, uses, and navigates TRACKS.

I found one and it seems to fit the bill in almost every way.   The unit is the DeLorme PN-40.   Most everything that Garmin does to annoy it’s customers, DeLorme handles better or just avoids the problem in the first place.   What do I mean?   I mean having to buy (or find on the net) the program to create routes on your pc/mac and then upload them to the gps.   I mean having to use an unlock code to make the maps work.   Hopefully you’ll never have a pc/mac computer fail, or have to replace a hard drive, because you’ll have to pony up for a new unlock code to use the maps you already bought.   You can install the maps on multiple laptops, but what if you have more than one gps?   This unlock code, serial number checking crap is a real annoyance to customers.   Do you hear me Garmin?   What if you lose the gps itself?   On the trail that is a distinct possibility.   So, that’s not Garmin’s fault.   But you can’t use the maps on your laptop because they’re unlocked only to one gps – the one you lost.   And the cycle starts over – if you let it.   OK, rant over.

I’m not going to buy a DeLorme for the first part of the TAT trip, because it doesn’t make sense to switch navigation devices this close to departure.   But for the western TAT next year, count on it.   Garmin has seen the last $ from me.

I’ve got a SPOT

TMI? You’ll have to decide that for yourself. The SPOT I’m referring to is a satellite-based tracking device. It can be used for several things but the main functionality is sending periodic reports of your position that can be viewed via a web browser. You can create a private (password protected) web page or a public web page that will show your position. If you ride alone it can be a comfort for a spouse to know that you’re OK.

In addition to tracking your progress, you can also set a “send help” message, and can send it by pushing a button. People on your notify list will get an email or sms message that you need help. You’d use this if you had a mechanical problem in a area without cell phone coverage. I know, the Verizon guy doesn’t want you to know that those areas exist, but we all know they do.

If the worst happens, and you (or someone riding with you) needs medical help, just press the 911 button. The local ambulance/search/rescue people are advised along with your exact location.

If the best happens, and you’re happily motoring along, you can send an “OK” message. The difference between tracking and the OK messages is that the tracking messages are sent every 10 minutes with no current way to alter the timing, and the OK messages are sent when you push the OK button. A lot of long-distance riders do not use the tracking feature, they just push the OK button at the top of the hour.

There are some interesting websites springing up that use the position information sent by the SPOT unit. The SPOT service only displays the last 50 OK messages, and maybe you’re on a long distance multi-day trip. There are ways around the “last 50” limitation.   You can enable Yahoo Fire Eagle to receive your tracking messages too.   Then you can use Jason Jonas’ website Spot Trip Manager to manage your trip / adventure location information and it can contain any number of tracking/OK messages.   It works very well.

GPS Update

I decided that it was time for a new GPS.   The weather radar feature on the Garmin 478 is very difficult to beat – it shows areas of precipitation and storms superimposed over your position on the map.   With the animation, you know which direction rain or storms are moving, and you can gauge how quickly they’re moving.   You basically have 3 choices – sprint ahead and get past them, slow down and let them pass in front of you (not really the best choice), or alter course to avoid them.   I guess there is actually a 4th choice – seek shelter for the night and not worry about running faster or slower or changing course.

After receiving a bill for XM’s Sailor package that runs $30 per month, on top of the $9 per month for XM, I decided the monthly charges were simply getting out of hand.   Time for a change.   I have an iPhone that gives me real-time weather radar, so I can see storms and areas of precipitation and alter travel plans with that information.   No, it’s not as convenient as seeing the information directly on my route of travel, but at $40 per month that’s just too much since I’m already paying for the iPhone as well.   So, I sold the 478 and the XM receiver/antenna.

I bought a Garmin Nuvi 760.   No, it’s not waterproof.   No, it doesn’t show weather radar on my route.   What it does is eliminate $40 monthly from the biking budget and add two things.   First, it has an mp3 player.   I’ve loaded music onto several sdhc cards – 60s, 70s, 80s, country, rock, and classical.   I just pick one and put it into the gps and select “shuffle”.   Second, it has bluetooth and is now paired with my iPhone.   I don’t make or receive calls while riding, but at least I can see who is calling and pull over to return a call or wait until the next fuel/bathroom/photo stop.   I’ve updated to the 2009 maps, and I can use Mapsource to upload waypoints, via points, and routes to the gps.   I can also download tracklogs from the gps, so I haven’t lost any functionality there.

Dealing with the not-waterproof issue on a motorcycle is important.   Sometimes the simplest solution is the best, and until I know differently I will just cover the gps with a ziploc baggie, secured with a plastic bread clip.   Inexpensive and effective.   Hopefully the gps will spend most of it’s time on the bike without the raincoat.

Stay tuned for more on-the-bike usage reports as the miles pile up this season.

NEXRAD weather radar…

…on the Goldwing. I activated the “Sailor” package from XM radio so that my Garmin 478 gps can display weather information directly on the screen. Not just a forecast, but actual, real-time weather radar. I called Garmin and told the lady I spoke with that I wanted to add the “Sailor” package to my account and she said it was only available for aircraft or boats. I decided to avoid the problem and just said that it was for my boat. After hanging up, I parked the bike outside with the gps on and about 20 minutues later I had weather radar on my bike. I zoomed out to see if there was any storm activity I could locate and there was.

It was west of Minneapolis towards the Minnesota-North Dakota state line, moving east. I called my friend Mike (of Soggy Bottom Run fame) and asked if it was raining where he was (he works in Eden Prairie) and he said that it wasn’t but that storms were forecast for later in the day. Then I told him that the radar display on my bike was telling me that the forecast may be correct. I’m hoping that this information will help keep me dry (or at least dryER) and avoid bad weather that brings with it reduced visibility and slippery pavement.

It seems that every extended trip I’ve taken lately has resulted in at least one soaking rainstorm and I sure hope this may be the ticket to bring that streak to an end.

Received my Garmin 478 gps

I sold my Garmin 2730 and purchased a Garmin 478 to replace it. Why, you ask? Mainly because I am getting tired of being rained on at least once on every long trip. I understand that rain is inevitable, I would just prefer not to ride in it if I have that option and I think the 478 may provide that option.

It has XM radio like my 2730, which is great while riding. But it also offers something the 2730 does not – the ability to receive and overlay NEXRAD weather radar on my route. Now I will be able to outrun, outflank, wait out, or in other ways increase my chances of staying dry. You don’t get too wet behind the Goldwing’s fairing, but the loss of traction, increased braking distance, and reduced visibility are the major problems. And if those issues (traction, braking, and visibility) affect me, they are also affecting the cars and trucks as well.

The subscription for NEXRAD from XM is the “Sailor” package, and it is pricey at $29 monthly. I have been assured that they are quite happy to suspend the subscription during the non-riding months and reactivate it when you will actually use it. Time will tell if the information helps to keep me dry, but every report I’ve read from people that use it paint a very positive picture.

XM antenna installation complete

I finally finished mounting the GXM30 XM antenna/receeiver for my garmin 2730 gps. I wanted it to be out of sight, and yet in a position where I would get a minimum of signal dropouts.

I picked the trunk. For a trial run, I used blue painters tape to cover the center top of the trunk and then taped the antenna there. Rode around a bit to be sure that location was going to work and it worked fine. 3 full bars and no dropouts – that’s the place.

I got some industrial strength velcro and put the fuzzy part on the inner trunk lid. I cut a circle out of the sticky part and put it on top of the gxm30 “puck”. Pushed it together and twisted a bit, but decided the wire needed to exit to the side rather than the front. Pulling it loose was not easy – this won’t come loose any time soon. Now the wire exits towards the right side of the bike.

Drilled a hole through the trunk in the front center, about 3/4 inch down from the top. In that location the lip of the lid will cover the hole and should prevent water entering the trunk. Because of the lid’s proximity, I used the flutes of a drill bit to make an “angled” hole so the I could route the wire from right to left and by doing that prevent a sharp bend. Once in place I covered both sides of the hole with closed cell foam weatherstripping to seal it back up.

My garmin 2730 came with an extension for the antenna, so I wrapped the connection with vinyl tape to keep water out and ran it along the left side of the frame. because the plug is larger than the cable, I wound up running it down by the alternator under the left side cover. There is a cable tie I loosened to get the connector through and then retightened it. The wire then runs up, behind the wiring harness, up past the left glovebox, and out by the triple tree. I removed the top shelter to get this wire routed properly.

There are three wires to the gps – power in, xm antenna in, and audio out. The audio out is a special unit I had Electrical Connection make for me, it is a ground loop isolator with the 3.5mm plug on a 36″ wire and the other end plugs into the aux input under the left glovebox. The factory wire is only 12″ long and really only works inside the glovebox. With the longer wire I can reach the gps and not worry about pulling it too tight during full-lock turns. I could have used a headphone extension cable but since this will get wet if it rains I decided the fewer connections the better.

I need to cover the three wires with spiral loom to make it neater, but the install is clean.

QD gps mount

I received a QD gps mount from Mounting Innovations and it works very well. One of the annoyances with the RAM mount system is that to remove the gps you must loosen the clamp. When you do that you lose the positioning that you so carefully adjusted last time. I’ve wired power and audio to be easily unhooked when I need to remove the gps, but I was still having to readjust the gps after remounting it each time.

I found the QD bracket and ordered one with a universal bracket. The bracket moves the RAM ball to the bottom which does allow for more flexibility in positioning and once it is set you’re ready to go. Now, when you remove the gps you simply flip the safety catch and open the lever. The gps comes off and the mount itself stays in position. When it’s time to go, just hook the back part of the mount and rotate down a bit, that releases the lever back to the “secured” position. Flip the safety catch and you’re ready to go. No more readjusting after every stop.

UPDATE 17 July: I’ve gone back to the center RAM mount after installing the QD bracket. Since it relocates the RAM ball to the bottom of the gps instead of the back, the short arm works well and seems to cut down on vibration. In my line of sight, the gps now pretty much covers up the lcd, which is OK, as you typically don’t really need it a lot. The gps has a clock and I don’t look too much at the odometer or tripmeters except when stopped. Now I have to work out the routing for the 3 wires (power, XM antenna, and stereo audio out) so it is neater.

On the 1000+ mile trip, the QD mount worked flawlessly, making it simple to put the gps away and out of sight. When saddling up again, there was no need to fiddle with the mount, just click, flip the safety, plug in, and go.

New GPS is here part 3…

I have used it a bit more now, and have played around with the 2D/3D north up/track up display options. The 2610 had only 2D map display, and you could choose between north up (north at the top, like you would usually read a map) and track up (the way you would orient a map so that a left turn will take you towards the left side of the map).

The 2730 has 2D north up/track up and 3D track up display options. Maybe my pilot background is showing, but I presonally prefer the 2D north up display. Positional awareness is what I taught as a flight instructor and understanding that a left turn while heading south takes you to the right side of the display is second nature.

To each their own, you can easily switch between the display modes and make your own determination.