4th annual Bourbon and Tobacco Tour of KY – postponed

The Bourbon and Tobacco Tour has been postponed to July 24-25, 2021.

Good pavement, nice gravel, light vehicle traffic, courteous drivers, and the hills of western Kentucky in the springtime – what’s not to like? Well, your legs might complain about some of the gradients, but the descents make it all worthwhile. And the riding companions – unparalleled.

A few updates for the COVID mess:

Rather than meeting at my house for dinner after the Saturday ride, we’ll just pick up dinner in Cadiz and meet at the park on the west side of town to eat and tell biking lies. My wife will be much happier with this, and there’s plenty of parking and tables for us. Because I don’t know what will transpire between now and the ride, please bring a mask and put it in your jersey pocket.

There are plenty of places to pick up some food – pizza at Casey’s, mexican at El Bracera, Sonic, Wendy’s, Taco Bell, KFC, Triplets, Cracker Barrel, and Subway. I’d rather have everyone at my house for a cookout, but I’m trying to make some adjustments that will work for everyone. I appreciate your understanding.

Friday dinner, July 23:

For those folks coming into town on Friday, we’ll meet at Triplett’s BBQ in Cadiz around 6pm for dinner. The restaurant is on US68/KY80 just west of I-24 at exit 65.

Saturday, July 24:

We will meet at 9:30am at the LBL Golden Pond Visitor Center on the Woodlands Trace Road, at the intersection of US-68/KY-80. There is plenty of parking at the visitor center. I will have some repair/adjustment tools, grease, chain lube, floor pump, work stand, and some spare tubes and patches. Hopefully no major repairs will be needed before, during, or after the ride but we’ll be prepared for the usual (and some of the unexpected). We’ll roll out from the parking area around 10am.

We will have a SAG driver again this year. It was a real luxury to have Greg volunteer his time and gas to follow us around in LBL, and he’s planning to join us again.

There is no cost for these rides, but if you wanted to kick in a few dollars for our SAG driver’s gas or a bite to eat for him I’m sure he would appreciate it.
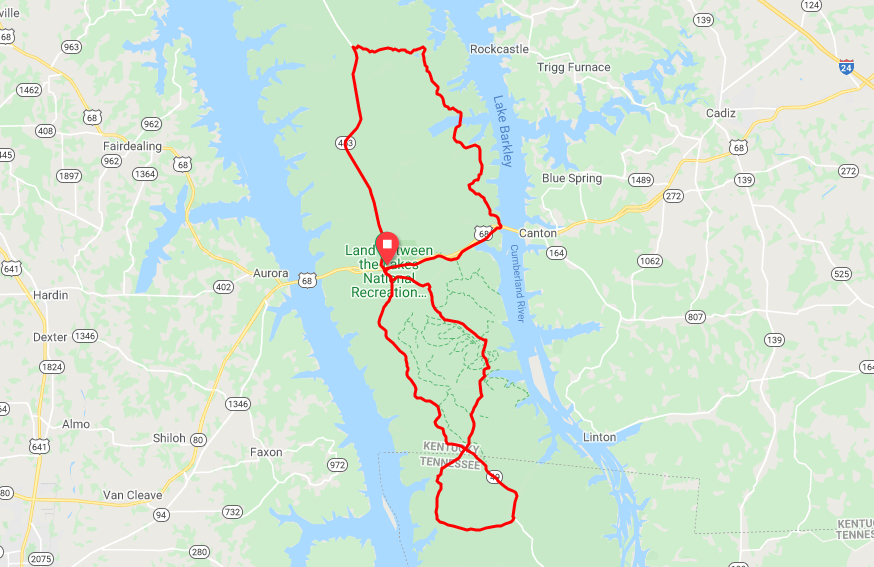
The route:

The route is the same as the 2020 ride, and is entirely within the LBL. This loop starts and ends at the Golden Pond Visitor Center in LBL, and is about 56 miles, all paved, with about 3500 feet of climbing. There are a small number of actual turns in this route, so hopefully there won’t be any issues with navigation or getting lost. I will give my cell number to riders, should assistance be needed during the ride. Cell coverage isn’t always the best in LBL, so bear that in mind. This is an unsupported ride, but we will do our best to help everyone finish up safely.


Click to Download Cue Sheet for the full route

Click to Download Cue Sheet for the partial route

Other cool stuff to do:

If you want to come in a day early, or stay over for a day or two, you could follow the Kentucky Bourbon Trail. If you like bourbon and want to sample the offerings by several distilleries, this is a great way to do it. Check out where the distilleries are located and plan your route.

You can drive north on the Trace Road, and drive through the Elk and Bison Sanctuary. There’s a small fee at the entrance to the sanctuary, and it’s well worth it. I’ve been there more than once and it’s a unique opportunity to see herds of bison and elk moving around the area. You do have to be in a vehicle – a bicycle vs a 2000 pound bison – no thanks.

There is a trap range close to the Lake Barkley Lodge, so if folks are interested we can shoot some clay targets. No prizes, just bragging rights. I have shotguns, ammunition, and clay targets – so all you’ll need is hearing and eye protection. If you’ve not done this before, it’s challenging and fun. If you’re new to this, I’ll be happy to help you shoot safely.

Post-ride cookout:

See the COVID notes above for Saturday dinner plans.

Sunday, July 25 – ride the trails:

If folks are interested, we’ll take some fatter-tired bikes out for some trail riding on Sunday. There’s a lot to choose from, the map links below will give you an idea of the variety available to us. A good choice is the Hardwoods Trail, from east to west all the way to Kentucky Lake. Mostly crushed limestone and a lot of fun. I would rate this trail as easy/moderate. Bikes with road tires won’t be the best choice for this – wider tires are the best way to go.

A local friend and riding buddy will lead the gravel ride on Sunday, he knows the gravel routes in LBL much better than I do.

At the north end of the LBL, there is a good singletrack loop named the Canal Loop. I would rate this loop as moderate/difficult.

There is a fairly new option, the trails in Livingston County, to the north of LBL. I’ve ridden there a few times and it’s a lot of fun. These trails are rated intermediate/difficult, so bring your “A” game. Be advised, you will want some tread on your tires for these trails.

We’ll figure out when and where to meet during the cookout and I’ll update the information here.

LBL Hike and Bike Trails

LBL Maps – click the Trails tab.

Livingston County MTB Trails

There are 500 miles of trails and 200 miles of roads in LBL. It is great to have this area so close to home. Not all of the trails are available for bicycling, so check the website while you scout a potential route.


Temperatures to expect:

The average high temperature in July is in the mid-to-upper 80s, and a low average in the upper 60s, so warm but still pretty good riding weather.

Lodging:

Here are some options for lodging and some suggestions for restaurants in the area.

Kenlake State Resort Park Reservations – this is a good choice if you want to ride to the start

Lake Barkley Lodge reservations – there is now a bike path paralleling us-68/KY-80 to the west so it’s a good ride to the start

Both are reasonably priced and are just a few minutes from our starting place. Kenlake and Lake Barkley both have restaurants too. For those folks arriving on Friday, we’ll meet for dinner.

Red Roof Inn – Cadiz – this is about a 15-20 minute drive to the start

Quality Inn – Cadiz – this is about a 15-20 minute drive to the start

Both of these hotels are at I-24 exit 65, and are within walking distance of Triplets. Driving time to the start point is 20-30 minutes.

Bike Shop:

Bikes and Moore in Hopkinsville is a great shop that I’m happy to call “home”. I couldn’t find a complaint if I tried. Good folks and they’ll be happy to help you out, should you need more than a tweak or two. They have knowledgeable mechanics and a good parts inventory too if it comes to that.

Questions:

Contact me if you have any questions, I’ll do my best to help.

Please watch your speed while driving in LBL, it’s federal land, so speeding tickets are expensive – paraphrasing Agent K – “the rangers do not have a sense of humor they’re aware of.”

Raspberry Pi project – a milestone

After updating the humidity correction factors and clearing the log, I’ve now got a month’s worth of temperature and humidity data in the logs.

You can see that the upstairs temperature was much higher at the beginning of the period.  (click on the image to see the full size version)  That’s because I was there and was running electric heaters upstairs.  The temperature began to fall while I was getting ready to head home and turned them off – they are unplugged when I’m not there.  Seems smart to not risk an electrical problem and a fire when there’s no need for heating.

You can also see the daily temperature swings, more pronounced on some days than others.  The swings are larger when the sun is out, as you would expect.  The downstairs swings are not as big, because the windows have blinds (and there are only 2 windows downstairs vs 5 windows upstairs) so solar heating has less of a chance to warm things up downstairs.

The humidity is still higher than expected – I’ll need to recheck the sensors with the hygrometer and see if the numbers are still close.  Even if I wind up making a change to the humidity correction factors I don’t plan to restart logging.

Yes, it’s pretty cold inside right now.  That’s what happens when the only heat is a portable electric heater.

I’m sure you won’t be surprised by this, but I also made a couple of tweaks to the heat and cold alert functions in the python logger script.  When a heat or cold alert is rescinded, the email message includes the amount of time the alert was in effect.  Just a little more polish to the project.

New sight time

The sight on my Bowtech Fuel compound bow is decent, and the fiber optic pins are pretty bright.  It isn’t a high end sight – it works fine, but is missing a few upgrades that a higher-end sight will have.  Where this sight falls down is in the adjustments.  You loosen a allen-head cap screw and move the scope right or left, up or down for windage and elevation, respectively.  The sight pins adjust in the same way.  There aren’t any markings to indicate how far you’ve actually moved it, so getting it sighted in is a bit of a guessing game.

I decided to see what other sights were available on the used market.  Good quality new sights are upwards of $200, so going used seemed the best choice.  I found a good deal on a Sword Maximus Pro sight on the archerytalk classified section, which has micro click adjustments for windage and elevation.  The price was fair so I picked it up.  When it got here, I was impressed with the construction quality – it’s just a solid and well thought out sight with a nice light for the fibers.  What was missing were instructions for adjusting the 3 axes.  Not really a surprise for a used sight – most folks don’t keep the instructions once a part is installed – some folks never read the instructions at all (Pot, this is the kettle.  You’re black.).

So I emailed the company and they don’t have a manual available.  Odd.  I would have thought a manual would be a common thing to include with any bow sight, but apparently not.  I was able to get some advice from folks that have the same sight, and once I had a point in the right direction the adjustments made sense.

The sight is mounted and leveled, next is to get it sighted in.  The sight is a 5 pin sight, but one pin is not installed.  so I’ll sight it in for 10-20-30-40 yards.  10 and 20 yards can be adjusted at the indoor range at the archery shop, 30 and 40 yards will need to be done outside.

Restoring a classic Hoyt recurve

I decided to treat the Hoyt as a restoration project.  The history of this bow and the success archers had with it were the driving influence.

The limbs need nothing, but the riser needs some attention.  Since it’s a target bow, a brightly colored riser is the norm, and this originally came in black, white, blue, and red.  I think a metallic red would look great with the ivory colored limbs.  I reached out to Duane, a magician with paint who has painted and touched up several bikes for me.  I sent him a photo of the riser and told him what I had in mind.  He agreed to do the painting, and he already had some very nice red paint, a dark Mercedes red metallic.  Perfect.  I packed and shipped the riser to him.  It will probably take 3-4 weeks before I have it back and that’s fine.  I trust him to work his magic and I have no doubt of the quality of the result.

We’ve emailed back and forth about what can be painted and what needs to be masked off, so I think we’ve got that sorted out.  I have an arrow rest and a plunger ready to go on, and that’s enough to get started.  I’ll get the nocking points set up and then see how well I can shoot it.  I’m not expecting miracles here, I’m just learning.  Given that constraint, I’ll go slowly and make adjustments as needed.  Eventually I’ll (hopefully) be able to shoot it reasonably well.

Once I have the riser back from Duane, I’ll take some photos of it and of the assembled and strung bow.  Stay tuned.  If the shooting sessions go reasonably well, there might even be some photos of arrows in the target.  If they’re missing, well, then you’ll know how much work I have to do.

Raspberry Pi project – tweaks

My temperature monitoring project has been running very well, especially since I corrected the humidity sensor readings by applying a correction factor.  And the upstairs temperatures did drop below freezing a couple of days ago, so the tasks of shutting off the pump, draining the plumbing, and adding antifreeze in the traps were absolutely worthwhile.

But I decided that it would be nice to know when some threshold temperatures were reached without checking the web page.  I added code to the python3 logger script to write a file when a cold or heat threshold was reached.  It also sends an alert email message when this happens.  The web page that displays the temperature and humidity graphs looks for this file and indicates that a threshold has been crossed for cold or hot temperatures.

It seems the DHT22 sensors can waver back and forth a few tenths of a degree, and if that happens right at one of your threshold values, you will get an annoying collection of emails.  To address this, I implemented a buffer mechanism.  Now, the heat/cold alert will only happen when the temperature crosses the threshold and stays there for 3 consecutive checks.  Since I’m logging the values every 5 minutes, that means the temperature must remain either above (heat) or below (cold) for at least 10 minutes before an alert is sent.  When the temperature rises above the cold threshold, it must remain above the threshold for 3 consecutive checks before the alert is rescinded.  Rescinding a heat threshold works the same way.

I also added some code to rescind any existing cold or heat alerts when the logging daemon is restarted.  Since you can edit the threshold temperatures, it seems reasonable to start clean.  If an alert should be issued, it will take just a few minutes to get past the buffer mechanism.

So far this is working well.  On my next trip up there, I’ll recheck the sensors using the hygrometer and see if any alterations to the correction factors are needed.  If they are, it’s a trivial change to make.

Branching out

The compound bow kind-of equates to a modern bicycle in my mind, while recurve and longbows seem to be the bow version of classic bicycles.  If you’ve followed my bike builds, you know that I like classic steel bikes.  So it shouldn’t be a complete surprise that I would look for a recurve bow.

And I found one, a Hoyt Pro Medalist takedown bow, a TD/2 model.  This bow was made between 1976 and 1980 so it definitely qualifies as a classic.  In it’s day, this bow won literally everything there was to win in archery – from Olympic gold medals to World championships.  The asking price was reasonable, so I picked it up.

The grip was cracked, which is not unusual for these older bows.  The riser is cast magnesium and the grip slips onto the riser from the belly side of the bow (the side of the bow that is closest to your belly while shooting).  Finding a grip proved difficult (as in a complete lack of success) and then a post on archerytalk suggested that I look for a riser that had a grip on it that would fit the Hoyt.  I’ve been known to buy a complete bicycle to obtain some parts that are not available separately, so this seemed like a reasonable thing to do.  I found one and despite some shipping delays, it arrived in fine shape.  The grip is a tight fit on the Hoyt riser so I didn’t force it – I certainly don’t want to crack this grip knowing how difficult they are to find.

The rest and plunger that came with it were ok, but not great.  I figured out which rest and plunger would be good replacements and ordered them.

The limbs are 30# (30 pound pull) on a 24″ riser, so they’re a good weight to start with on a recurve journey.  They’re in excellent condition, no nicks or obvious wear.  Because this is an older bow, the recommended string material is Dacron.  The modern string materials are too harsh for these older limb without tip reinforcements so I ordered a new string made from Dacron.

Once the string arrived, I strung the bow and shot a few arrows into my target.  This is a completely different game to the compound bow.  Definitely a challenge to shoot well, but I like challenges.

Video security system – a problem

I’ve installed the two indoor cameras, and unfortunately there’s a problem with the upstairs camera.  This is what the image looks like right before it goes completely black.  The IR emitters aren’t working.  So at night, the image is completely black.  Not terribly useful.

I used the reset link on the camera’s web page, but that’s a software reset, not a hardware reset.  I’m sorry to say that didn’t resolve the problem.

I contacted Amcrest, and explained my problem.  The response suggested that I would need to do a hardware reset, since the software reset didn’t help.  To do that you need to disassemble the camera so that you can access the motherboard, and press a switch on the motherboard.  That will reset the login password, IP address, and video stream configuration.  A nuisance for sure, but maybe it will resolve the problem.  Honestly, I have my doubts – and can I trust a camera that required a hardware reset to restore proper functionality?  When will the next hardware reset be required – a week or a month later?  I had him send me an email with the hardware reset instructions – disassembling the camera voids the warranty, so I wanted some way to demonstrate that I took it apart at their direction should there be a future problem with it.

I’m 5 hours away from the cabin, so I don’t just run up there to try every resolution immediately.  I’ll try the hardware reset on my next trip.  If it works, great – but as I said earlier – it will still be suspect.  If not, I have a plan B.

I’ll connect both uninstalled cameras to the POE switch with patch cables and make sure that they work properly and that the IR emitters are behaving.  I hope that both remaining cameras work properly and I’ll pick one and replace the upstairs camera with it.  I’ll need to reset the IP address, which is easy enough, and verify the video stream parameters as well.  Then I’ll have both indoor cameras working properly, and I can install the remaining good camera in it’s place on the roof soffit.  The bad one will be sent back for a replacement under warranty.  It’s not a difficult install, mounting the camera is pretty easy.  Running the cat6 cable is a little more involved but again not too bad.  Since I borrowed a cable tester from a friend (thanks Bob) I can make sure that the cable connectors are properly crimped on and that the cable is good.  Then I plug it into the POE switch and set it up in ZM.

I’ll leave this camera in Monitor mode for now, since it’s an outdoor camera I’ll need to set up detection zones and ignore zones to try and minimize false positives.  I don’t expect this will be a set-it-and-forget-it process, I think I’ll spend some time tweaking this before it’s reliable.

I’m curious what will show up when I change the mode to Modect and start recording events.